java, spring

Say hi to Spring Boot!

I am here after a long time to pen down some thoughts for just getting back to the habit of writing. I hope I’ll be able to continue sharing my thoughts more frequently.

Since its been a while, I thought I’ll share something that is not too complicated as it might make it tough for me to get out of my inertia. So, I am going to share an opinionated way of bootstrapping a light-weight java web-application.

With new languages and features coming out for public use every now and then, it is high time that legacy languages such as Java (I may no longer be able to claim this, as Java is quickly catching up to the latests trends with more sexy language features with the new java release cycle) catch up to speed with cool features other languages/frameworks offer. There were times, when I used to spend a whole day just to kick-start a basic skeleton web app with a ton of configuration files and downloading a cryptic application server and copying my class files to weird locations. But with a lot of frameworks that support java integration, things have gotten much better.

There’s plethora of easy-to-use frameworks that has made Java backend/full-stack engineer’s life a lot better. But I’d like to share my experience on how easy it is to setup a skeleton web-app using my favorite Springboot (Although I use dropwizard for my day-to-day activities at my work for various reasons, Spring has always been my favorite framework of choice ever since my revelation about things getting easier in Java).

I can keep blabbering about Spring framework forever. But I prefer to see things in action. So let me start with my rambling!

Say hi to Initializr!

The biggest pain for getting started with any framework is actually “getting started“! With spring boot, getting started is as easy as clicking a few buttons. Don’t believe me, let me introduce you to spring initializr.

Spring initializr page

For setting up a spring-boot project using spring initializr, you need to;

  1. Setup your build tool (We are using maven as part of this post) as described here (Ignore if you already have maven installed)
  2. Go to https://start.spring.io/
  3. Fill a form to enter metadata about your project.
  4. Decide on dependencies to add to your project (I did not add any for this demo).
  5. Click on generate!

Well, once we extract the zip file, we need to open it using any IDE (I am using IntelliJ here but I wouldn’t expect any issues with Eclipse, Netbeans, etc). Here is how your extracted project would look like.

Extracted project structure

You can find this as part of my commit here in github if you are following along with me. All you now need to do is to build the project and run the DemoApplication.java file. If you like to run it from terminal like I prefer, run the following command from your root directory.

mvn spring-boot:run

Run using maven

If you observe now, the app starts and shuts down immediately, let’s fix that next.

But where’s the web app?

Like I said, since we did not choose any dependency in the spring initializr page. Spring initializr assumed that we were not building a web-app and gave us the bare minimum configuration for running our app.

There is a reason why I did not choose any dependency when I bootstrapped the app. Often, when we start with an app, we do not know the exact set of dependencies we’d need to start off with. It is crucial for us to know how to add additional dependencies after we started working on the app. Easy way would be to click on the Explore button on the spring initializer web-page by choosing your dependency. Let me show how easy it is in the following gif.

Copying the web starter dependency

Now that you’ve copied the required dependency to power a web app, let’s go ahead and change our pom.xml so we could pull in the needed dependencies for bootstrapping a web-app.

Your pom file should look like my pom file in this commit.

Great! now we need to just add some magic and we are all set. For every web-app (Restful web app), you need the following logical entities for defining your restful web service;

  1. HTTP method (Defines the type of operation)
  2. Endpoint name (Defines a name for the operation)
  3. Parameters & Request payload (Defines user input for processing)
  4. Response (Defines how the response should look like)

These four things are what we are going to define in our DemoApplication.java.

Your DemoApplication.java should look like the one I have in this commit here.

That’s it! we are done with the code changes. Build your project and run it using the same command mvn spring-boot:run and now you should logs similar to the below screenshot.

Lets now open a browser and navigate to the following url

http://localhost:8080/sayHi?name=springboot

This should print the text Hi from springboot in your browser.

Congratulations your spring-boot app is ready and running with absolutely no configuration and no external server setup.

I know this is a lot of magic, but we’ve barely scratched the surface. There is a LOT of magic going on behind the scenes. I will attempt my take on it as part of a separate post in future. So long!

Standard
java, libraries

RxJava: Hot Observables

Hot observables are a type of observables where the observer would be able to multicast the message simultaneously to all its subscribers at once rather than creating one stream for each subscriber. Let me elaborate that a little bit. Usually, when you have an Observable, a subscriber subscribing to this observer will initiate the subscription and consume every message until the complete event is sent out. Every other subscriber will start the consumption from the start again.


List<Integer> integerList = IntStream.range(1, 11).boxed().collect(Collectors.toList());
Observable<Integer> integerObservable = Observable.fromIterable(integerList)
.map(integer -> integer * 2);
Disposable subscribe1 = integerObservable
.map(integer -> integer * 10)
.subscribe(integer -> System.out.println("From first subscriber: "+integer));
Disposable subscribe2 = integerObservable
.map(integer -> integer * 100)
.subscribe(integer -> System.out.println("From second subscriber: "+integer));

The output of the above code would be:

From first subscriber: 20
From first subscriber: 40
From first subscriber: 60
From first subscriber: 80
From first subscriber: 100
From first subscriber: 120
From first subscriber: 140
From first subscriber: 160
From first subscriber: 180
From first subscriber: 200
From second subscriber: 200
From second subscriber: 400
From second subscriber: 600
From second subscriber: 800
From second subscriber: 1000
From second subscriber: 1200
From second subscriber: 1400
From second subscriber: 1600
From second subscriber: 1800
From second subscriber: 2000

When you have more than one Observer, the default behavior is to create a separate stream for each one. We do not want this behavior always. Hot Observables are used to solve this. If there is a scenario where we want to share Observables, RxJava has a specific way to achieve this. Let’s see how that is done.


// Define your publisher
ConnectableObservable<Integer> integerObservable = Observable.fromIterable(integerList)
.map(integer -> integer * 2)
.publish();
// Define your subscribers
Disposable subscribe1 = integerObservable
.map(integer -> integer * 10)
.subscribe(integer -> System.out.println("From first subscriber: " + integer));
Disposable subscribe2 = integerObservable
.map(integer -> integer * 100)
.subscribe(integer -> System.out.println("From second subscriber: " + integer));
//Start publishing simultaneously
integerObservable.connect();

The above example is how you define a hot obsevervable. ConnectableObservable is a special type of Observable that would send events to all its subscribers simultaneously. All you need to do is to define your publisher by calling publish() method. Then define your subscribers normally as you would do with a normal Observable. Once you define your subscribers, you need to call the connect() method on the ConnectableObserver to start publishing the message simultaneously to all the subscribers.

Let’s see the output of the above code snippet:


From first subscriber: 20
From second subscriber: 200
From first subscriber: 40
From second subscriber: 400
From first subscriber: 60
From second subscriber: 600
From first subscriber: 80
From second subscriber: 800
From first subscriber: 100
From second subscriber: 1000
From first subscriber: 120
From second subscriber: 1200
From first subscriber: 140
From second subscriber: 1400
From first subscriber: 160
From second subscriber: 1600
From first subscriber: 180
From second subscriber: 1800
From first subscriber: 200
From second subscriber: 2000

ConnectableObservable will force emissions from the source to become hot, pushing a single stream of emissions to all Observers at the same time rather than giving a separate stream to each Observer.


Standard
maven reactor
build-tools, java

Maven reactor: A smart way to a modular project structure

Usually, I would just avoid any thing that involves XML processing or XML configuration in it. So, I wasn’t a big fan of maven either when I started using it. Have I had any good alternate to build projects, I would have undoubtedly inclined towards it. Now, I do understand that gradle is still out there giving a very tough competition to maven. But, I feel it still has lot of distance to cover up; Maven just has got an awesome head start and I don’t think it could be replaced by gradle, even though with a lot new framework’s supporting it (Android, Spring, etc.). I was quite amazed to know what capabilities that maven could do to ease up the life of a programmer.

We can go on and on if I start talking about maven. But I would like to share one interesting feature I like about maven; The Reactor plugin.

It is often recommended to have your projects small and concise for obvious reasons. But usually, we find one huge project or a bunch of small standalone projects that depend on each other. Even if we divide a huge project into multiple small and cohesive projects/libraries/modules, we still have an overhead to manually make sure that the projects are built in the right order to make sure the right dependency is picked up. Many projects end up growing enormously due to this extra overhead on the developer when building the project.

Maven, does have a smart way for us to manage the modules for us without us having to make sure if the modules in the projects are built in the right order. Let’s see how that is done.

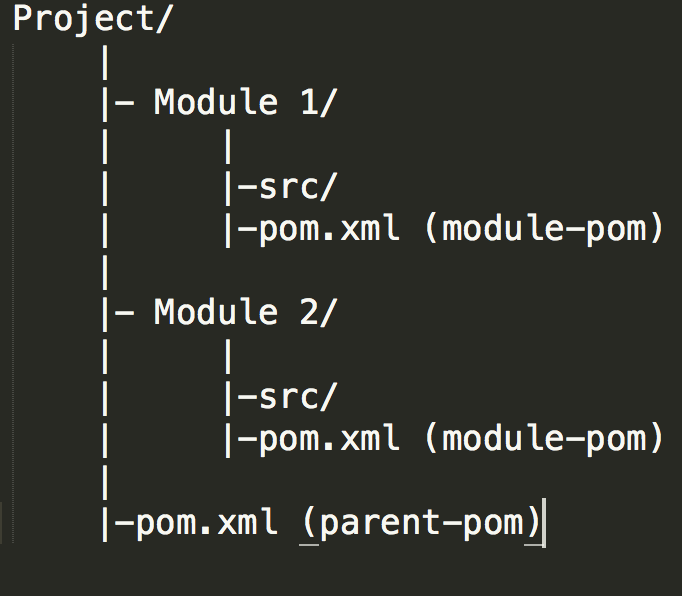
So, how reactor project works is that, you would have to setup a top-level pom that manages all your modules. This is usually called the parent-pom. All the modules that are part of this project will just be another simple maven project that will inherit this parent-pom. Along with this you will also, need to specify to the parent-pom on what are its children/modules. This will ensure maven does all the magic for you while its building your project.

Structure of a Maven reactor project

Structure of a Maven reactor project

That is all you need to do. Let’s now take a look at how to define your parent-pom.

Parent-pom:


<?xml version="1.0" encoding="UTF-8"?>
<project xmlns="http://maven.apache.org/POM/4.0.0&quot;
xmlns:xsi="http://www.w3.org/2001/XMLSchema-instance&quot;
xsi:schemaLocation="http://maven.apache.org/POM/4.0.0 http://maven.apache.org/xsd/maven-4.0.0.xsd"&gt;
<modelVersion>4.0.0</modelVersion>
<groupId>com.indywiz.springorama.reactor</groupId>
<artifactId>maven-reactor-parent</artifactId>
<packaging>pom</packaging>
<version>1.0-SNAPSHOT</version>
<modules>
<module>maven-reactor-app</module>
<module>maven-reactor-util</module>
</modules>
</project>

view raw

parent-pom.xml

hosted with ❤ by GitHub

If you check out what is different when you compare the pom with a traditional pom file is the following.

  • Packaging is set to pom instead of jar/war. This is because, your parent-pom is just a maven entity to manage your module, it is not a project that produces any artifact for you.
  • The modules tag. This tag is responsible for defining what are all the projects that the reactor has to manage.

Keep in mind that the order you define your modules does not matter, we will go thru that part in the end.

Now lets look at the module-pom.

Module-pom:


<?xml version="1.0" encoding="UTF-8"?>
<project xmlns="http://maven.apache.org/POM/4.0.0&quot;
xmlns:xsi="http://www.w3.org/2001/XMLSchema-instance&quot;
xsi:schemaLocation="http://maven.apache.org/POM/4.0.0 http://maven.apache.org/xsd/maven-4.0.0.xsd"&gt;
<parent>
<artifactId>maven-reactor-parent</artifactId>
<groupId>com.indywiz.springorama.reactor</groupId>
<version>1.0-SNAPSHOT</version>
</parent>
<modelVersion>4.0.0</modelVersion>
<artifactId>maven-reactor-util</artifactId>
<name>maven-reactor-util</name>
<properties>
<project.build.sourceEncoding>UTF-8</project.build.sourceEncoding>
<maven.compiler.source>1.8</maven.compiler.source>
<maven.compiler.target>1.8</maven.compiler.target>
</properties>
<dependencies>
<dependency>
<groupId>org.apache.commons</groupId>
<artifactId>commons-lang3</artifactId>
<version>3.7</version>
</dependency>
<dependency>
<groupId>junit</groupId>
<artifactId>junit</artifactId>
<version>4.11</version>
<scope>test</scope>
</dependency>
</dependencies>
</project>

view raw

module1-pom.xml

hosted with ❤ by GitHub

So, in this example, the first module is just a util library where I am using commons-lang3 library from apache. One other thing you will have to note is that we do not need to specify the groupId and the version in this pom. They are inherited from your parent-pom.

Now, I would like to use this module as a dependency on my module 2. The second module’s pom is similar to the first module. I just add the first module as the dependency to it.


<dependency>
<groupId>com.indywiz.springorama.reactor</groupId>
<artifactId>maven-reactor-util</artifactId>
<version>1.0-SNAPSHOT</version>
</dependency>

Now, all you have to do is to build the parent pom and see the magic happen.

Maven reactor build result

Maven reactor build result

So, what just happened was that, when we built the parent pom, reactor build part kicked in and maven started to check what are all the modules that come under this project, build the dependency graph and dynamically figured out that module2 (i.e the util project) depends on module 1 (the app module) and build util module before it started building the app module.

I deliberately, reversed the order in which I defined the modules in the parent pom. If you check the parent-pom’s modules tag, we defined app module before the util module. I did that on purpose to show that the order in which we define does not matter. Maven reactor will figure out the right order to build these project irrespective to the order in which they are defined in the parent pom.


<modules>
<module>maven-reactor-app</module>
<module>maven-reactor-util</module>
</modules>

I hope you guys also enjoyed this post. I’d be happy to hear your feedback. In case you can check out the complete example in github here.

Standard
RxJava
asynchronous, java, libraries

RxJava: A much needed programmer friendly library

Recently, I had to do a lot of concurrent-programming. To be honest, it has not been a pleasure ride. Writing java programs with concurrency in mind is not a straightforward task. Primary reason being, not many utilities come bundled with the language to ease up the concurrent task in hand. A few of them to name are Future, CompletableFuture, Executors. In my opinion, the best help java provides to us is thru CompletableFutures. We have talked about CompletableFutures in a post already.

Nevertheless, I feel that CompletableFutures solves a very specific problem, i.e. to chain asynchronous tasks together in a very fluid way. Ideally what we would want in a concurrent program is the ability to not worry about number of threads, a pool to manage threads whilst having the ability to compose and chain tasks together.

RxJava is one such library that solves scenarios like this with ease. Though RxJava is not designed to solve problems involving concurrency, the underlying concepts that RxJava is based on, implicitly gives us an awesome way to develop concurrent applications.

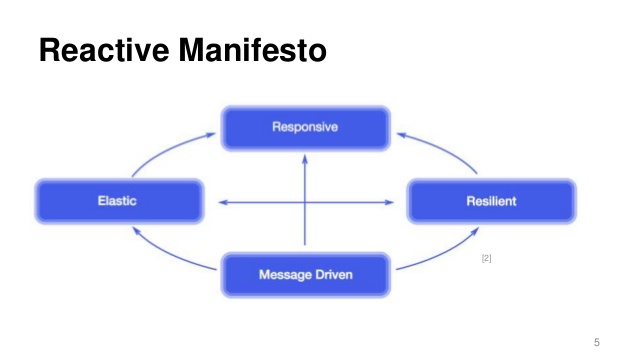
RxJava is based on the Reactive Manifesto. Reactive manifesto primarily deals with four main traits as shown in the figure below.

Reactive manifesto traits

Reactive manifesto traits

Let’s not get deep into each one of these traits. But the reason RxJava provides easy concurrent programming inherently is due its message-driven trait.

According to the reactive manifesto:

Reactive Systems rely on asynchronous message-passing to establish a boundary between components that ensures loose coupling, isolation and location transparency. This boundary also provides the means to delegate failures as messages. Employing explicit message-passing enables load management, elasticity, and flow control by shaping and monitoring the message queues in the system and applying back-pressure when necessary.

RxJava leverages this message-driven trait in all its components. Hence, we could design a seamless message publish-subscribe kind of application that inherently gives you ability to change your implementation to an asynchronous very easily. We just have to specify if the task on hand is CPU intensive work or I/O bound. RxJava internally takes care of managing the concurrency for you.

Let’s see an example on what I meant.

Observable.fromArray(1, 2, 3, 4, 5)
    .observeOn(Schedulers.computation())
    .map(integer -> {
      System.out.println("Executing cpu intensive task on thread : "+Thread.currentThread().getName());
      return cpuIntensiveTask(integer);
    })
    .observeOn(Schedulers.io())
    .map(integer -> {
      System.out.println("Executing i/o bound task on thread : "+Thread.currentThread().getName());
      return ioBoundTask(integer);
    })
    .blockingSubscribe(integer -> System.out.println("Result = "+integer));

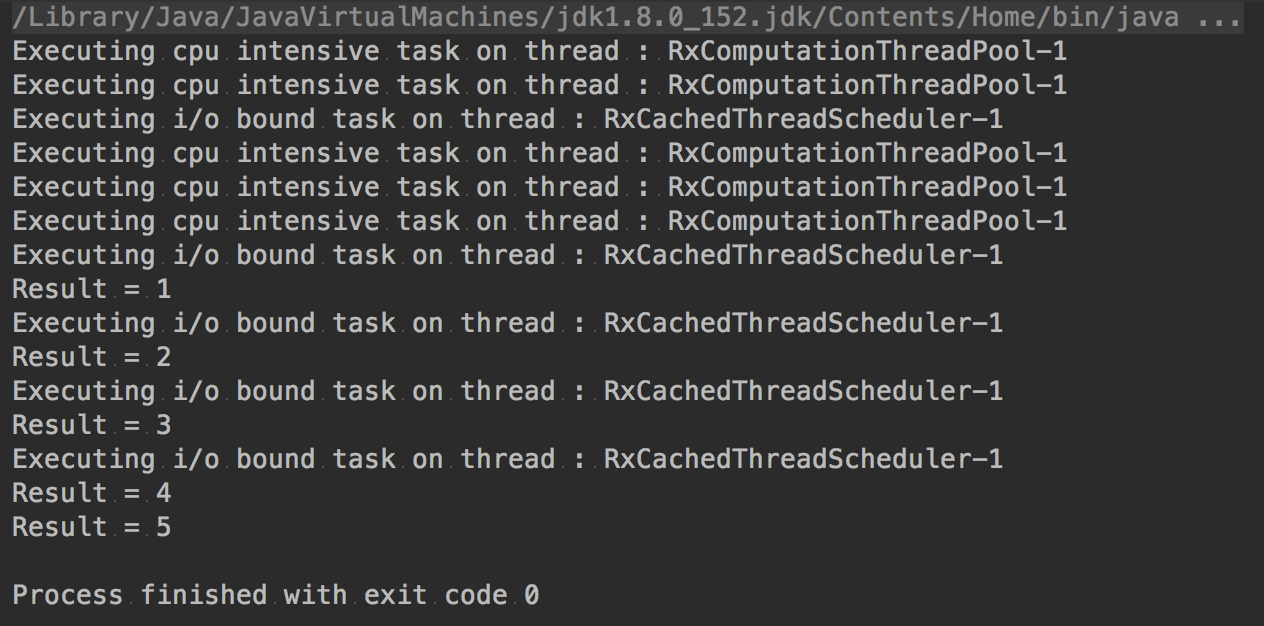
If you see the above code, all we had to specify was to tell if it is going to be a task that is cpu-intensive or i/o-intensive. This will output the following:

Screen Shot 2018-05-20 at 12.49.08 AM

The above code is very similar to a Java stream but, yet it is very different from what streams are. RxJava provides the fluidity that java streams provide along with the power of composing multiple asynchronous tasks similar to what we know about CompletableFutures.

There is lot more to RxJava than what we have talked about in this post. Lets get more hands on in future posts. The intent of this post was to share my perspective on RxJava and why it is one of the best programmer-friendly library out there. I would encourage you to definitely try out RxJava and let me know what you feel about this awesome library.

Standard
asynchronous, java

Combining/Merging more than two CompletableFuture’s together

I recently ran into a situation where I wanted to make a bunch of asynchronous calls and gather those results, to finally construct an object based on the result. Well, in other words, I was exploring on how to resolve these CompletableFuture‘s and merge them properly.

For the sake of this post, lets take an example and work our way through. My CompletableFuture‘s would look something like this snippet.


ForkJoinPool myThreadPool = new ForkJoinPool(10);
CompletableFuture<Integer> myCompletableFutureInt = CompletableFuture.supplyAsync(() -> {
try {
int sleepTime = new Random().nextInt(2000);
Thread.sleep(sleepTime);
System.out.println(
"Sleeping for " + sleepTime + " in myCompletableFutureInt on thread "
+ Thread.currentThread().getName());
} catch (InterruptedException e) {
e.printStackTrace();
}
return new Random().nextInt(50);
}, myThreadPool);
CompletableFuture<BigDecimal> myCompletableFutureBigDecimal = CompletableFuture
.supplyAsync(() -> {
try {
int sleepTime = new Random().nextInt(1000);
Thread.sleep(sleepTime);
System.out.println(
"Sleeping for " + sleepTime + " in myCompletableFutureBigDecimal on thread "
+ Thread.currentThread().getName());
} catch (InterruptedException e) {
e.printStackTrace();
}
return new BigDecimal(new Random().nextDouble() * 50);
}, myThreadPool);
CompletableFuture<Long> myCompletableFutureLong = CompletableFuture.supplyAsync(() -> {
try {
int sleepTime = new Random().nextInt(1000);
Thread.sleep(sleepTime);
System.out.println(
"Sleeping for " + sleepTime + " in myCompletableFutureLong on thread "
+ Thread.currentThread().getName());
} catch (InterruptedException e) {
e.printStackTrace();
}
return new Random().nextLong();
}, myThreadPool);

First thought that occurred to me was to collect all the CompletableFuture‘s in a List and iterate over the List, do a CompletableFuture::get on each and collect these results into another List.

I hated to do this. In fact, I did not even try this, because, this was the main reason why I did not want to use a Future. I wanted a clean way to have a handle on my flow. I wanted to chain these Future‘s so I can construct the object in fluid way while handling errors. Doing a blocking call to get the result of each CompletableFuture would defeat the whole purpose of having a CompletableFuture.

Second way was to chain all these CompletableFuture‘s with a thenApply method. But, if you think about it, sure, I’ll be able to chain it properly, but that would soon become a mess. I understood it once I tried it. Here’s how the code would look if I used thenApply method to chain the CompletableFuture‘s and combine them.


CompletableFuture<CompletableFuture<CompletableFuture<Map<String, Object>>>> result = myCompletableFutureBigDecimal.thenApply(bigDecimal ->
myCompletableFutureInt.thenApply( integer ->
myCompletableFutureLong.thenApply(aLong -> {
Map<String, Object> objectHashMap = new HashMap<>();
objectHashMap.put("IntegerValue", integer);
objectHashMap.put("LongValue", aLong);
objectHashMap.put("BigDecimalValue", bigDecimal);
return objectHashMap;
})));
try {
Map<String, Object> re = result
.get(2, TimeUnit.SECONDS)
.get()
.get();
System.out.println(re);
} catch (InterruptedException | ExecutionException | TimeoutException e) {
e.printStackTrace();
}

Each thenApply method would return another CompletableFuture. So, every time we are in a need to add an asynchronous call, we would need the return type to have a nested CompletableFuture. Also, see how awful it would be if we would want to get the value of the result. We are doing a get() call on all the nested CompletableFuture. That is not good at all and would not be much different than the list-loop approach we talked about before.

Now, at-least with this method we were able to achieve some kind of chaining for these CompletableFuture‘s. All we now need is to make the end of the chain return one CompletableFuture that has the Map object ready for us to consume. Fortunately, there is a way to do it using the awesome thenCompose method. So, what’s so special about this thenCompose method.

The thenCompose method is like flatMap in Java streams. Like how a flatMap would take in a Stream and return another stream by flattening it out, thenCompose would flatten a CompletableFuture.

Visual representation of Java's flatMap operation

Visual representation of Java’s flatMap operation

Like the above figure illustrates, we can use thenCompose method to return a new CompletableFuture by flattening the inner CompletableFuture‘s. All we have to do is, keep flattening the CompletableFuture‘s and use thenCombine to mimic as if we were just combining two CompletableFuture‘s together.


CompletableFuture<Map<String, Object>> myObjectCompletableFuture =
myCompletableFutureBigDecimal.thenCompose(bigDecimalValue ->
myCompletableFutureInt
.thenCombine(myCompletableFutureLong,
((integerValue, longValue) -> {
Map<String, Object> objectHashMap = new HashMap<>();
objectHashMap.put("IntegerValue", integerValue);
objectHashMap.put("LongValue", longValue);
objectHashMap.put("BigDecimalValue", bigDecimalValue);
return objectHashMap;
})));

Since we have just three CompletableFuture‘s to merge, we used thenCompose to flatten-up two CompletableFutures to one and then chained the resulting flattened CompletableFuture to the third CompletableFuture, where we combine all the results to construct our Map and return it.


try {
Map<String, Object> myObjectMap = myObjectCompletableFuture.get(2, TimeUnit.SECONDS);
myObjectMap.entrySet().forEach(stringObjectEntry -> System.out
.println(stringObjectEntry.getKey() + " = " + stringObjectEntry.getValue().toString()));
} catch (InterruptedException | ExecutionException | TimeoutException e) {
e.printStackTrace();
}

Once we have the final result we just call a blocking call just once. The beauty is, no matter how many CompletableFutures we chain together we just call get once to get result from the final merged CompletableFuture. Here in our case, the get() will wait for utmost two seconds to get the result or throw a TimeoutException.

Result of the resolved CompletableFuture

Result of the resolved CompletableFuture

This method allows us to chain as many number of CompletableFuture‘s together, compose them nicely and get the result in a very fluid way.

Let me know what you feel about this way of resolving CompletableFuture‘s. I would also love to know if there is any other better way of merging two or more CompletableFuture‘s together into one. Just leave a comment below and I’ll be happy to discuss further. Cheers!

Standard
java, spring

Integration graph when using Spring Integration Java DSL

The drawing shows me at a glance what would be spread over ten pages in a book. –Ivan Turgenev

In my recent post on Spring Integration: A hands on introduction, I have a diagram that illustrates a spring-integration flow. I feel that such an illustration, gives us an awesome way to both document your flow and act as a dashboard to look thru when the spring-integration project has been deployed to have near real-time stats on what is the load on a channel, speed thru which your messages are flowing thru, etc.

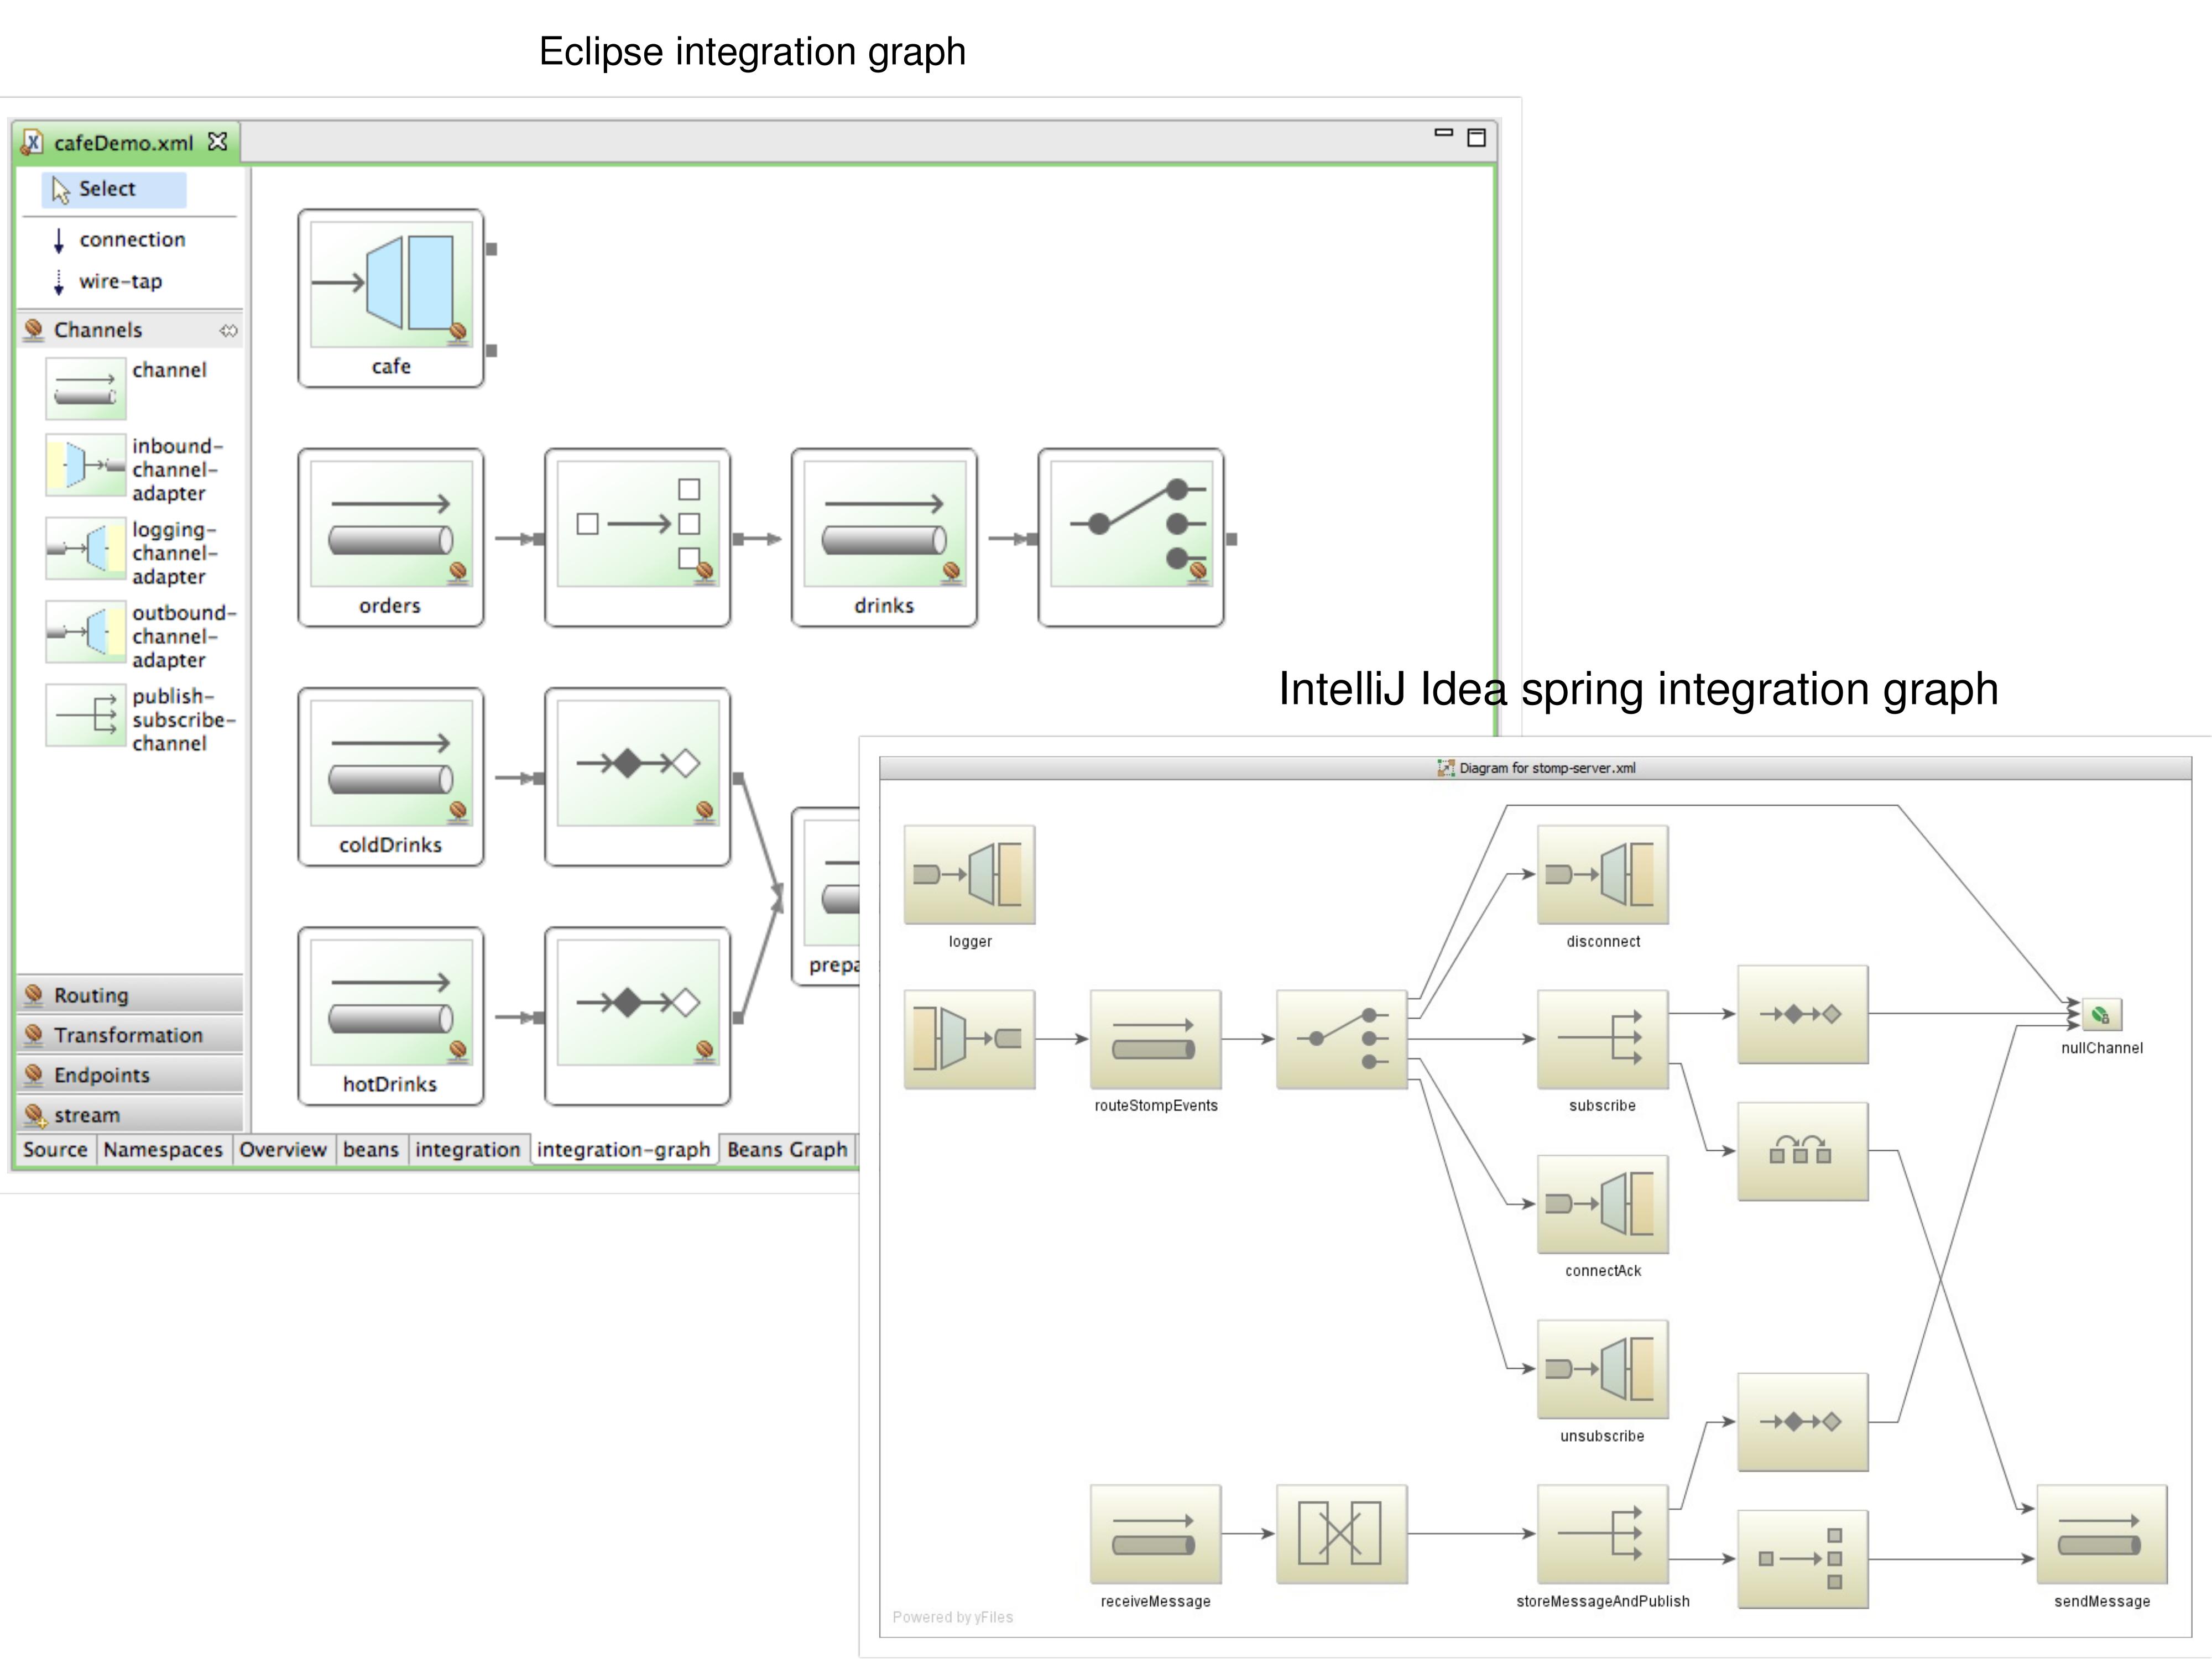
If you have used spring-integration using XML config, the IDE‘s would have this straight out of the box (Both in STS Eclipse & IntelliJ Idea).

Integration flow graphs for spring-integration project in Eclipse and IntelliJ IDEA IDE's

Integration flow graphs for spring-integration project in Eclipse and IntelliJ IDEA IDE‘s

Well, if you have gone thru that post, you would have noticed that we did not use XML configs for the project, instead, we used the new and cool Java DSL to define out flow. One downside of this I feel to this approach is that, since this whole Java DSL way of defining the flow is fairly new and since our flows get generated dynamically when spring builds up its context, we have no plugins for any IDE‘s (At-least, none to my knowledge) that will give us this integration-graph out of the box.

Fortunately, spring-integration folks have not taken this lightly, we do have a way to visualize the flows when using spring-integration with Java DSL. Its not too straight-forward, but its not difficult either. Let’s today see how to visualize your integration-flows using the project, Spring-Flo.

The link for that project will take you to the angular-1.x branch of the project. That is because, currently the whole project is in the process of migration to angular 4/5. Hence the stable version that we can use in the meantime is the one that is in the angular-1.x branch. I will update this post if I find a newer stable version.

So, that being said, we need to use this external project in-order to visualize your flow, which is not too bad I feel (IMO, it is better than not having any means to visualize your flow). Also, I feel it would be giving more cleaner way to have a dashboard kind of view to see how are things going in real-time. So, I like the idea of having this as a different project.

Let’s right away jump into how to configure your spring-integration project to use spring-flo project. To begin with, this is how spring-flo project will be able to generate the integration-graph for you.

Your integration project will expose an endpoint (/integration) which will give the near real-time stats of your integration components (Channels, Service Activators, etc.). This is just a plain JSON response. The interesting part is that, spring-flo project will latch on to this endpoint, and will provide you with an interesting visualization of the JSON reply.

Dependencies needed:

  1. Make the project a web-based one, by including the spring-boot-starter-web. This will give you access to the /integration endpoint when your project boots up.
  2. Include the spring-integration-http dependency to use the @EnableIntegrationGraphController on your application class.


<!– For exposing the /integration endpoint –>
<dependency>
<groupId>org.springframework.boot</groupId>
<artifactId>spring-boot-starter-web</artifactId>
</dependency>
<!– For @EnableIntegrationGraphController annotation –>
<dependency>
<groupId>org.springframework.integration</groupId>
<artifactId>spring-integration-http</artifactId>
</dependency>

view raw

pom.xml

hosted with ❤ by GitHub

Code configuration for your spring-integration project:

  1. Add the @EnableIntegrationGraphController to your application class.
  2. You need to allow access for spring-flo application to access the endpoint /integration by specifying the allowedOrigins on your annotation.


@SpringBootApplication
@EnableIntegrationGraphController(allowedOrigins = "http://localhost:8082&quot;)
public class Application {
public static void main(String[] args) {
SpringApplication.run(Application.class, args);
}
}

Here in this example, I am planning to run the spring-flo application on the same machine in the port 8082, so I’m just specifying that when I’m configuring my integration project.

That’s all you have to do to your spring-integration project.

Running spring-flo project:

  1. Clone the spring-flo project to your machine.
  2. Checkout to the angular-1.x branch
  3. Start your spring-integration project.
  4. Run the spring-flo/samples/spring-flo-si project on 8082 since our spring-integration project will be expecting spring-flo to be running on port 8082.
  5. Go to localhost:/8082 and click on Load button to load your integration flow graph.

Spring integration flo diagram

It is not pretty straight-forward, but still, we have something to work on until spring team would give a better solution in the future which I’m pretty confident they would. Until then, we have this web application that provides a wonderful way to watch our integration-flows.

Standard
java, libraries

Lombok – A must have library to spice up your Java

Java, unfortunately, does have a lot of unwanted verbosity when it comes to creating classes. Whilst there are new languages on jvm competing with each other by having to write very less amount of boilerplate code, java still is not even close to these competitors.

While we sit and complain about the language’s inability to incorporate reduction of unwanted ceremony of code, ProjectLombok, has given us a work around to make our lives a little bit easier.

Alright, I am a Java programmer about to write a simple model class for my CRUD operations. I will have to go thru the following steps to create the model.

  1. Create the model-class.
  2. Define the attributes for the model with right scope. (Since its good practice to encapsulate attributes properly, I will have to set the access specifier to private. Personally I’m not a big fan of this).
  3. Create default constructor and parameterized-constructors based on my needs.
  4. Optionally, I also have to override toString(), equals() and hashCode() if needed.
  5. If I am done with the above stuff, I might think of have a nice builder pattern if needed, so that I can have a fluid way to populate the attributes.

This has to be repeated and could sometimes be a very painful thing, if we have to do it for many models and, things for sure will get annoying if the model class has to change. Clearly, we don’t have to do such things in modern languages like scala or groovy or kotlin. These languages give you getters, setters, etc., for free. It would be awesome if java would also come up with something like this to avoid unnecessary boilerplate code when instantiating classes. Well, Lombok exactly solves this thing for us. It silently generates all the boiler plate code by integrating with the build tool and also the IDE for you to focus just on specifying what you need and the business logic.

If you look at the above steps we followed to create a model class, except creating the class and the attributes (which we have to anyway in any language) everything else, starting from specifying access specifier, creating getters and setters for the same, having to override bunch of obvious methods could be avoided and Lombok provides an awesome way to achieve this thru annotations.

Below is a model where I used Lombok annotations in the Spring-Integration post.


package com.indywiz.springorama.springintegration.model;
import javax.persistence.Entity;
import javax.persistence.Id;
import lombok.AllArgsConstructor;
import lombok.Builder;
import lombok.Data;
import lombok.NoArgsConstructor;
import lombok.ToString;
@Data
@Entity
@Builder
@ToString
@NoArgsConstructor
@AllArgsConstructor
public class Person {
@Id
private Long personId;
private String personName;
private String personPhoneNumber;
}

view raw

Person.java

hosted with ❤ by GitHub

This is a very simple model where I have just three fields, couple of JPA annotations and a bunch of Lombok annotations. The interesting thing to see is what Lombok generated for me when compiling the class.


package com.indywiz.springorama.springintegration.model;
import javax.persistence.Entity;
import javax.persistence.Id;
@Entity
public class Person {
@Id
private Long personId;
private String personName;
private String personPhoneNumber;
public static Person.PersonBuilder builder() {
return new Person.PersonBuilder();
}
public Long getPersonId() {
return this.personId;
}
public String getPersonName() {
return this.personName;
}
public String getPersonPhoneNumber() {
return this.personPhoneNumber;
}
public void setPersonId(Long personId) {
this.personId = personId;
}
public void setPersonName(String personName) {
this.personName = personName;
}
public void setPersonPhoneNumber(String personPhoneNumber) {
this.personPhoneNumber = personPhoneNumber;
}
public boolean equals(Object o) {
if (o == this) {
return true;
} else if (!(o instanceof Person)) {
return false;
} else {
Person other = (Person)o;
if (!other.canEqual(this)) {
return false;
} else {
label47: {
Object this$personId = this.getPersonId();
Object other$personId = other.getPersonId();
if (this$personId == null) {
if (other$personId == null) {
break label47;
}
} else if (this$personId.equals(other$personId)) {
break label47;
}
return false;
}
Object this$personName = this.getPersonName();
Object other$personName = other.getPersonName();
if (this$personName == null) {
if (other$personName != null) {
return false;
}
} else if (!this$personName.equals(other$personName)) {
return false;
}
Object this$personPhoneNumber = this.getPersonPhoneNumber();
Object other$personPhoneNumber = other.getPersonPhoneNumber();
if (this$personPhoneNumber == null) {
if (other$personPhoneNumber != null) {
return false;
}
} else if (!this$personPhoneNumber.equals(other$personPhoneNumber)) {
return false;
}
return true;
}
}
}
protected boolean canEqual(Object other) {
return other instanceof Person;
}
public int hashCode() {
int PRIME = true;
int result = 1;
Object $personId = this.getPersonId();
int result = result * 59 + ($personId == null ? 43 : $personId.hashCode());
Object $personName = this.getPersonName();
result = result * 59 + ($personName == null ? 43 : $personName.hashCode());
Object $personPhoneNumber = this.getPersonPhoneNumber();
result = result * 59 + ($personPhoneNumber == null ? 43 : $personPhoneNumber.hashCode());
return result;
}
public String toString() {
return "Person(personId=" + this.getPersonId() + ", personName=" + this.getPersonName() + ", personPhoneNumber=" + this.getPersonPhoneNumber() + ")";
}
public Person() {
}
public Person(Long personId, String personName, String personPhoneNumber) {
this.personId = personId;
this.personName = personName;
this.personPhoneNumber = personPhoneNumber;
}
public static class PersonBuilder {
private Long personId;
private String personName;
private String personPhoneNumber;
PersonBuilder() {
}
public Person.PersonBuilder personId(Long personId) {
this.personId = personId;
return this;
}
public Person.PersonBuilder personName(String personName) {
this.personName = personName;
return this;
}
public Person.PersonBuilder personPhoneNumber(String personPhoneNumber) {
this.personPhoneNumber = personPhoneNumber;
return this;
}
public Person build() {
return new Person(this.personId, this.personName, this.personPhoneNumber);
}
public String toString() {
return "Person.PersonBuilder(personId=" + this.personId + ", personName=" + this.personName + ", personPhoneNumber=" + this.personPhoneNumber + ")";
}
}
}

view raw

Person.java

hosted with ❤ by GitHub

This is how the class would have looked if I had to write class manually without Lombok. With just 24 lines of code with Lombok, I get getters and setters, builder pattern, a constructor with all the three attributes, a default constructor and a toString() method that appends all the toString() of the class attributes. I could have gotten a lot more, by just adding bunch more Lombok annotations.

Installing Lombok:

Installing lombok is very straight-forward. You need to let the IDE and the build-tool know that you are using Lombok. Rest is all done for you by lombok.

Letting the IDE know:

  1. Download the Lombok jar from here.
  2. Either double-click on the downloaded jar file or run the following command from the location where you downloaded jar.
    java -jar lombok.jar
  3. Lombok will automatically scan your system to find the IDE installations and ask you permission to install Lombok plugin automatically for you. If it was not able to find the installations in their default locations, you also can specify the location where you have installed your IDE too. Screen Shot 2018-04-22 at 6.53.24 PM
  4. Then click on Install button and you are set.

Letting your build tool know:

For maven:

Add the following dependency to your pom file.


<dependencies>
<dependency>
<groupId>org.projectlombok</groupId>
<artifactId>lombok</artifactId>
<version>1.16.20</version>
<scope>provided</scope>
</dependency>
</dependencies>

For gradle:

Add the following to your build.gradle file.


lombok {
version = 1.16.20
sha256 = ""
}

And you are all set to use Lombok in your development environment. May you have all the power that Lombok annotations brings forth. To know what other annotations that Lombok offers take a look at the official documentation here.

Standard
java, spring

Spring Integration: A hands on introduction

Designing software with high cohesion and loose coupling is something many software teams strive for. While, there are different strategies to achieve this, one common approach many take is to use message-driven architecture.

In a nutshell, message-driven architecture deals with interactions among different modules in a service/app communicate using messages shared thru a common broker. If you want to get to know more about the perks of using a message-driven architecture, I would highly recommend that you read “Enterprise Integration Patterns” by Bobby Woolf and Gregor Hohpe. This book exposes several concepts and design strategies, that are widely recognized and practiced in various enterprises. There are multiple open source implementations libraries for this book. Most widely used ones are Apache Camel and Spring Integration.

In this post, lets see how to easily set up a spring-integration project. To keep it simple, let create an app that facilitates integration between filesystem and a database. For this exercise, lets imagine we need to enter records to a database and the client would only give us a pipe-delimited file. Our intent is to consume this file, read the records and write it to a database. This is clearly not really a huge integration problem to solve, but for simplicity sake lets see how spring-integration would help us achieve this integration.

Steps :

  1. Keep polling a directory at a fixed rate/time interval
  2. Read every new file (preferably with a pattern) that is dropped in the directory
  3. Process every line and transform the line to create a record to persist
  4. Persist records to a data-store

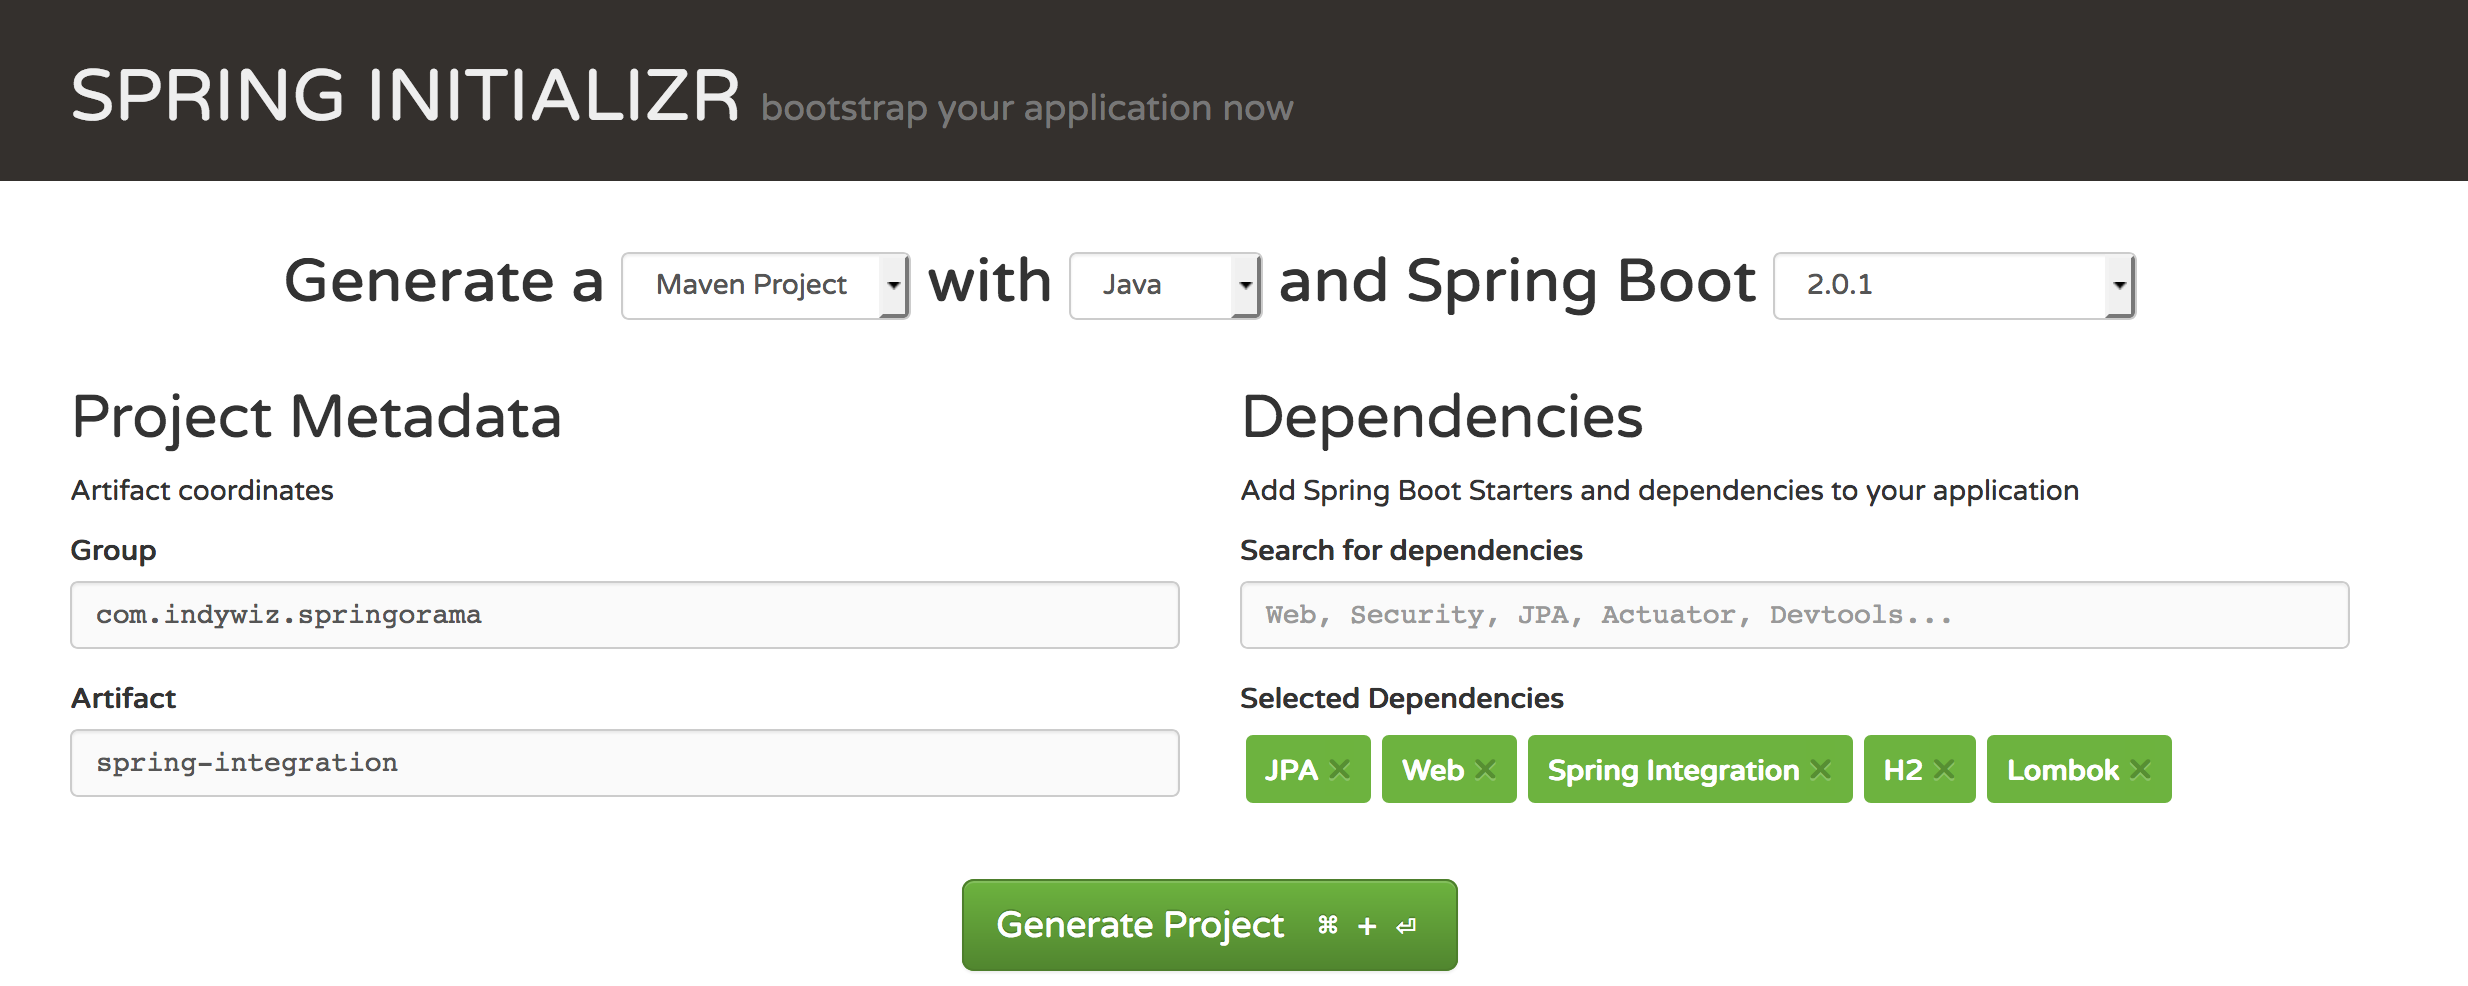
Now, lets create a spring boot application using spring initializr project with the following dependencies.

spring initializr project dependencies for spring integration

I used the following dependencies while bootstrapping the spring boot project.


<dependencies>
<!– Spring starter dependencies –>
<dependency>
<groupId>org.springframework.boot</groupId>
<artifactId>spring-boot-starter-data-jpa</artifactId>
</dependency>
<dependency>
<groupId>org.springframework.boot</groupId>
<artifactId>spring-boot-starter-integration</artifactId>
</dependency>
<dependency>
<groupId>org.springframework.boot</groupId>
<artifactId>spring-boot-starter-web</artifactId>
</dependency>
<!– Spring integration dependencies –>
<dependency>
<groupId>org.springframework.integration</groupId>
<artifactId>spring-integration-http</artifactId>
</dependency>
<dependency>
<groupId>org.springframework.integration</groupId>
<artifactId>spring-integration-file</artifactId>
</dependency>
<!– Database dependency –>
<dependency>
<groupId>com.h2database</groupId>
<artifactId>h2</artifactId>
<scope>runtime</scope>
</dependency>
<!– Util dependencies –>
<dependency>
<groupId>org.projectlombok</groupId>
<artifactId>lombok</artifactId>
<optional>true</optional>
</dependency>
</dependencies>

Note that I am using spring-integration-file and spring-integration-http that do not come bundled with spring-boot-starter-integration. Also, to keep it simple, I am using an in-memory h2 database to persist the data. I am using lombok to avoid manually writing getters and setters for the model class. I will elaborate in more depth on how lombok is beautifying java classes in a different post.

Now, the ground work is all laid. Let’s get started to make stuff work with these dependencies.

All we have to do now is to define our spring-integration flow and let spring do the magic for us.


@Configuration
public class IntegrationFlowConfiguration {
@Autowired
PersonRepository personRepository;
@Bean
public IntegrationFlow fileInputFlow() {
return IntegrationFlows.from(
//Setting up the inbound adapter for the flow
Files
.inboundAdapter(new File("/tmp/in"))
.autoCreateDirectory(true)
.patternFilter("*.txt"), p -> p.poller(Pollers.fixedDelay(10, TimeUnit.SECONDS)
.errorChannel(MessageChannels.direct().get())))
// Transform the file content to string
.transform(Files.toStringTransformer())
//Transform the file content to list of lines in the file
.<String, List<String>>transform(wholeText -> Arrays.asList(wholeText.split(Pattern.quote("\n"))))
//Split the list to a single person record line
.split()
//Transform each line in the file and map to a Person record
.<String, Person>transform(eachPersonText -> {
List<String> tokenizedString = Arrays.asList(eachPersonText.split(Pattern.quote("|")));
try {
return Person.builder()
.personId(Long.parseLong(tokenizedString.get(0).trim()))
.personName(tokenizedString.get(1).trim())
.personPhoneNumber(tokenizedString.get(2).trim())
.build();
} catch (Exception e) {
return null;
}
})
.filter(Objects::nonNull)
// Save the record to the database.
.handle((GenericHandler<Person>) (personRecordToSave, headers) -> personRepository
.save(personRecordToSave))
.log(Level.INFO)
.get();
}
}

Let us now go thru what are we doing by analyzing the code.

If you are familiar with spring framework in general, the above code might not seem very unfamiliar to you. All we are doing is to initialize a bean in a configuration class.

It is interesting on what spring integration is doing for us behind the scenes when initializing the context. Spring-integration will collect all the IntegrationFlow beans, pass them through IntegrationFlowBeanPostProcessor, which creates the required components for the integration. This enables a clean way to let us focus on the flow rather than defining the integration components. All the logic that is going in as the business logic could very well sit inside a lambda or be defined as a POJO and be used inside the flow.

It is important to note that we use quite a few enterprise integration patterns terminology here while defining the IntegrationFlow. Let us take a quick birds-eye view on what they mean.

  1. Message Channel
  2. Inbound Adapter
  3. Transform
  4. Split
  5. Filter
  6. Handler

If you haven’t already noticed, all the other components/terminology I listed above are part of the IntegrationFlow bean, except the first one; MessageChannel. That is because, as we discussed above when talking about message-driven architecture, every component defined above collaborate with each other thru a message channel. You could imagine these message channels like a queue to which a publisher publishes data to, and a consumer which consumes that data. If you are still confused, this diagram could help you visualize the role of MessageChannels.

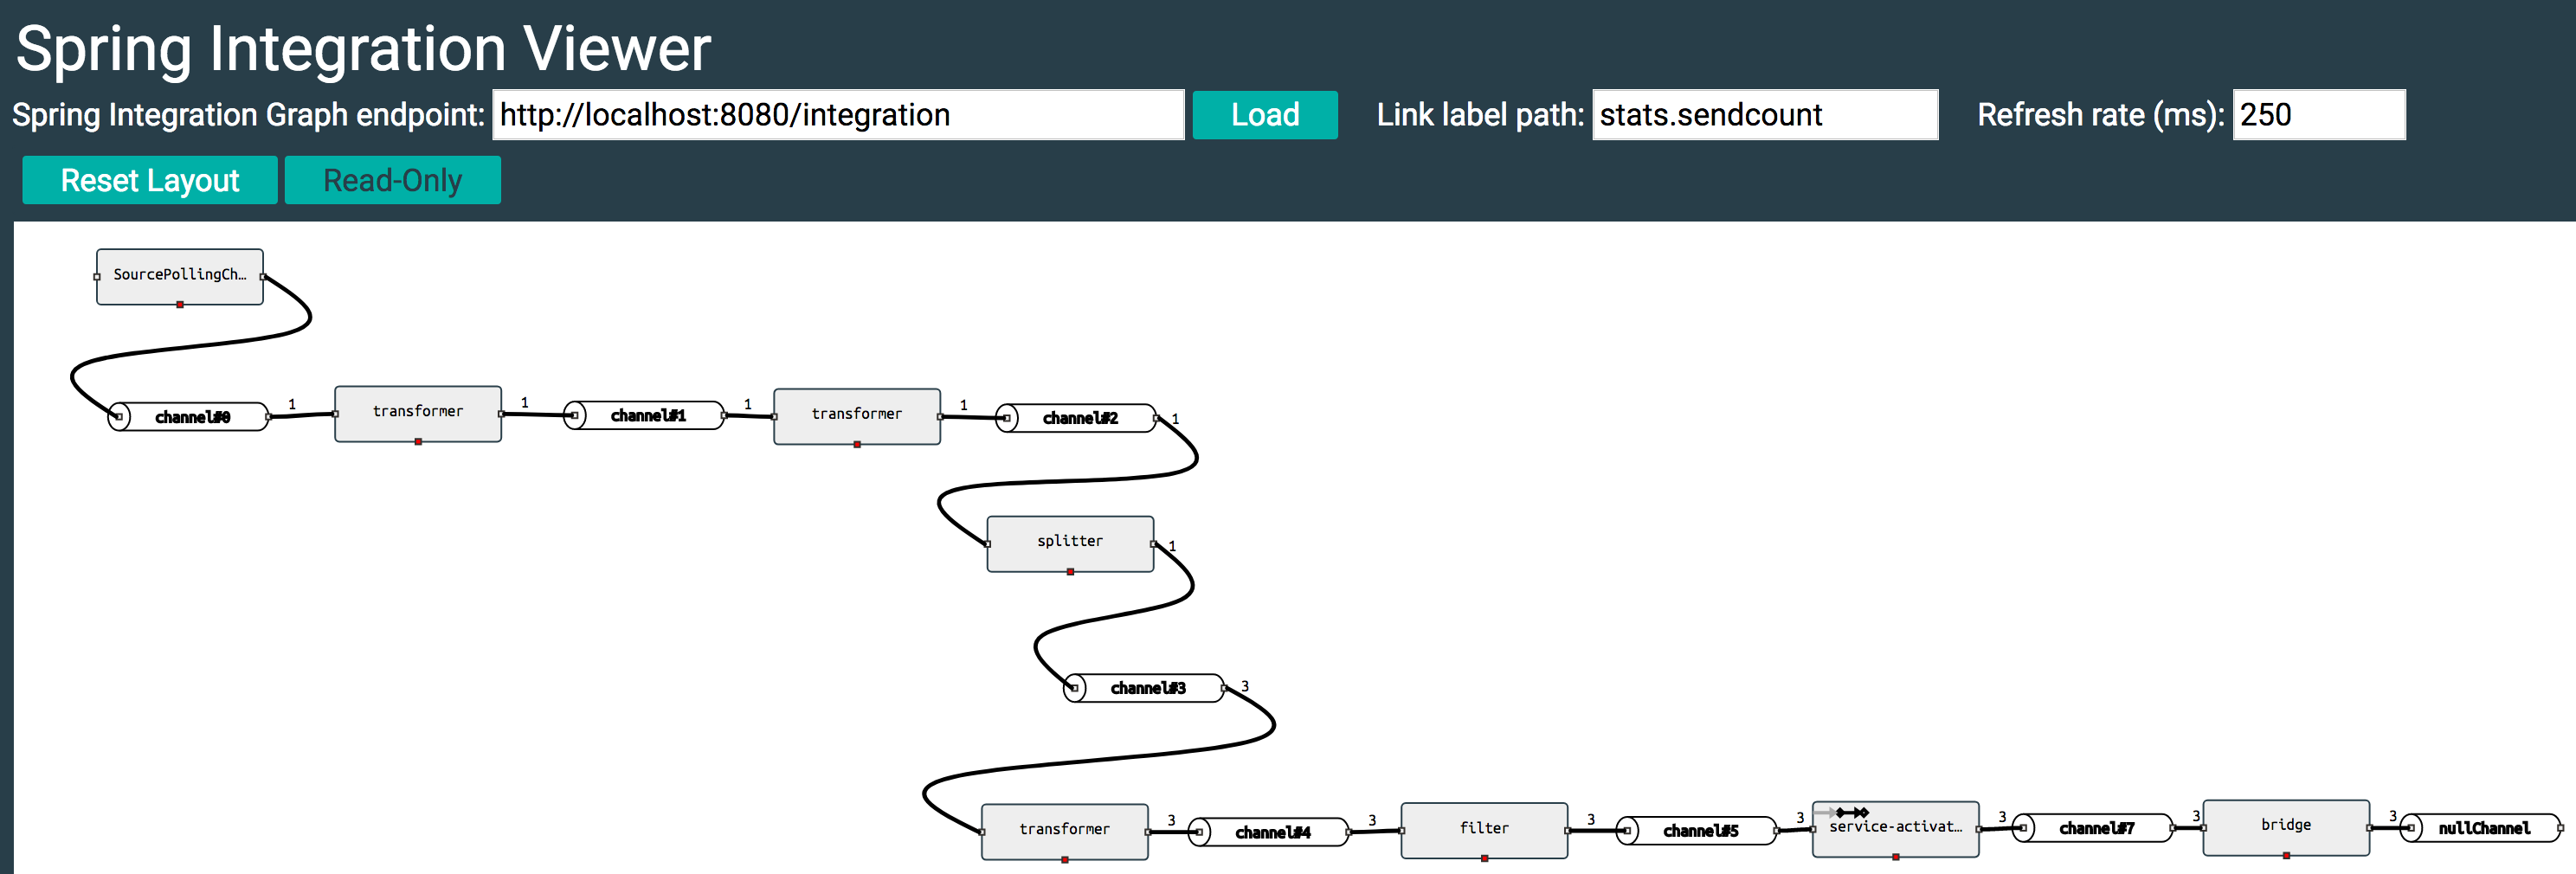
Spring integration flo diagram

The above diagram is actually the integration flow diagram for the integration flow we defined. If you observe, there is a small pipe between each component, that pipe is the implicit message channel that spring-integration creates for us to pass down the data in the pipeline.

Adapter:

Adapters are an enterprise integration component that act as a message endpoint that enables connecting a single sender or receiver to a MessageChannel. Here in our example, we are using an inbound-adapter to keep polling a directory for every 10 seconds to see if there is any new files with extensions in the directory. Spring-integration provides inbound and outbound adapters for solving common integration endpoints. We are using a file-inbound-adapter in the example.

Transformer:

Transform component is very straightforward. This component will take in an input and pass out a transformed message as output.

Splitter:

Splitter will take in a list as input and split the items inside that list to pass items, one by one as a separate message down the flow. In our case we would want to split list of person records as lines of text to single line and pass it down the flow to enter one record at a time.

Filter:

Filter is also very straightforward, as it will just decide on whether to pass the message down the pipeline or not, based on a predicate test. In our case, the predicate is that the object should not be a null.

Handler:

A message handlers just reads messages from a message channel and decides on how to handle the message. Usually handlers are the components that occur at the end of a pipeline. It is optional to pass the data down to another channel. If you do not specify channel, the message will be discarded by passing the message to a nullChannel.

These components are just those that we encountered in this IntegrationFlow, there are many other enterprise integration components. To read more about other components, go thru the documentation of spring-integration project here.

Getting back to our example, to make our integration kick off, all I have to do is to drop a file with an extension of “.txt” into the /tmp/in directory (Since I’m polling on to that directory. Of course this could be passed in as a property value as well).

Contents of the file should look something similar to the following:

1 | person1 | 1234567890
2 | person2 | 3214325345
3 | person3 | 3123322132

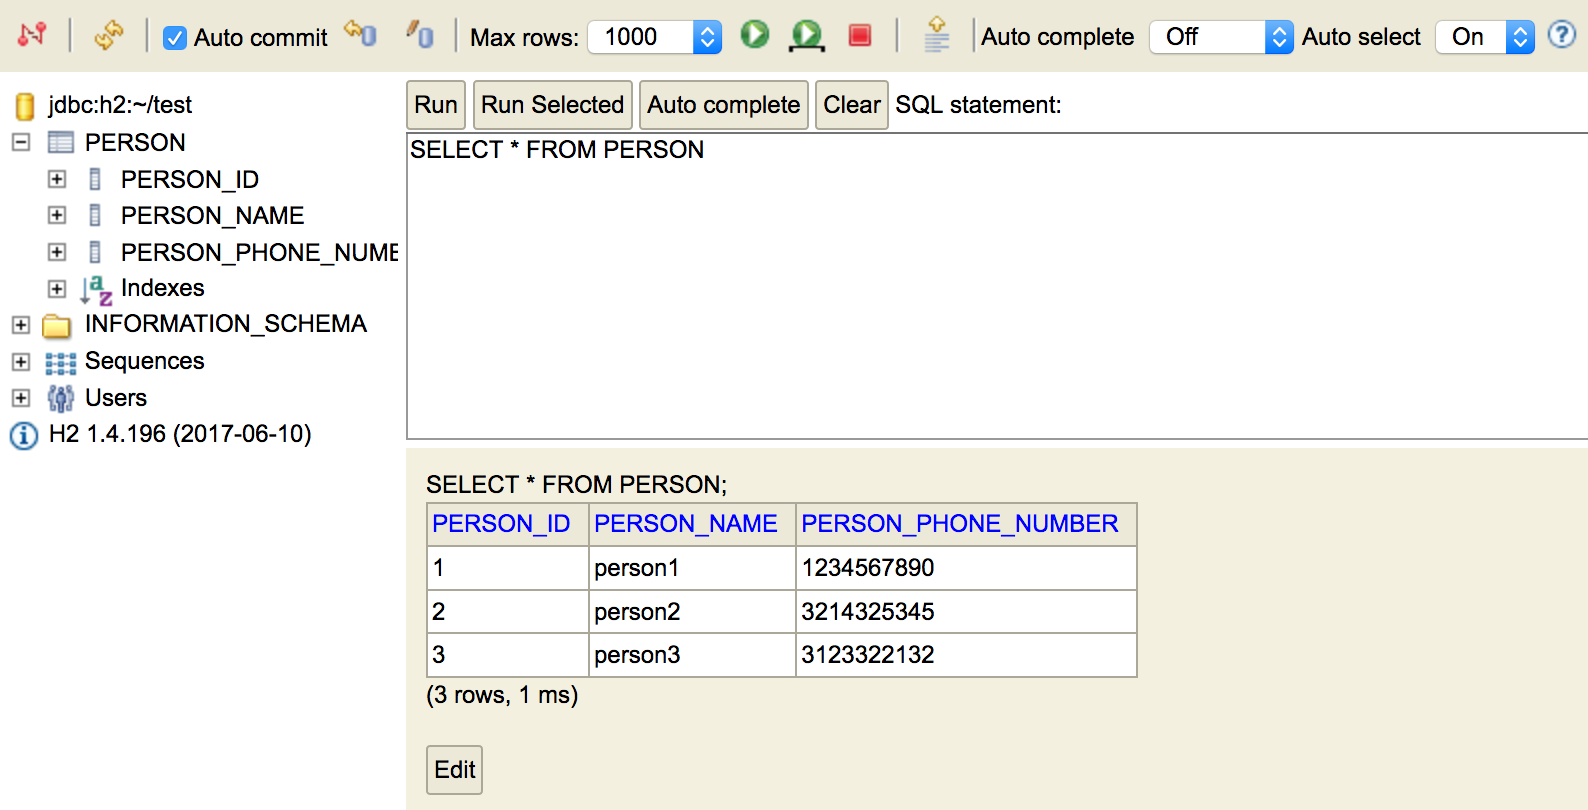
This text file will be consumed and will get persisted as person records into our in-memory data-store.

Screen Shot 2018-04-17 at 2.54.01 PM

Clearly, I did not go thru every minute detail on setting up the project. If you want to take a more finer look at the project, you can refer this project on github here.

Standard
asynchronous, java

CompletableFutures – Asynchronous programming made easy

Asynchronous programming is often not a very pleasant experience when it comes to Java. Java concurrency could be very challenging, there is an awesome book on this topic by Brian Goetz named “Java Concurrency in Practice“. It is quite extensive and often considered a definite read if you are working on projects involving Java or concurrency.

While there are many problems that threads, in general, could cause, my pick of the most annoying part is that when I want to chain parallel stuff together and pass down the result once I resolve a result in a pipeline kind of data-flow.

New languages like Scala, Javascript, etc., that have a good language design when it comes to writing concurrent programs. For example, Javascript provides an elegant solution for chaining asynchronous calls using promises. In my quest for something similar in Java realm, I was all excited when I first learned about java.util.concurrency.Future interface. While Futures were a good step towards a better future of Java, it did not catch up to the modern requirement of the Java community.

According to Oracle,

[1]A Future represents the result of an asynchronous computation. Methods are provided to check if the computation is complete, to wait for its completion, and to retrieve the result of the computation. The result can only be retrieved using method get when the computation has completed, blocking if necessary until it is ready. …

[1] https://docs.oracle.com/javase/7/docs/api/java/util/concurrent/Future.html

If you focus on the official documentation of Future interface, it says one disappointing thing;  we will have to wait or manually check if the Future is done by callingisDone() method on the Future. So, if you want to use a Future you would have to keep polling the future to see if the future is complete.

Example:


package completablefutureexample;
import java.util.Random;
import java.util.concurrent.ExecutionException;
import java.util.concurrent.ExecutorService;
import java.util.concurrent.Executors;
import java.util.concurrent.Future;
public class App {
public static void main(String[] args) throws ExecutionException, InterruptedException {
//Future example
ExecutorService executorService = Executors.newFixedThreadPool(2);
Future<Integer> future = executorService.submit(() -> {
System.out.println("Executing a task.");
try {
Thread.sleep(1000);
} catch (InterruptedException e) {
e.printStackTrace();
}
return new Random().nextInt(20);
});
while (!future.isDone()) {
System.out.println("Task not yet done…");
Thread.sleep(100);
}
System.out.println("The future is resolved. Value generated = " + future.get());
executorService.shutdown();
}
}

view raw

App.java

hosted with ❤ by GitHub

Also, if you think of how to chain subsequent calls, it can get really messy. We will have to check if the Future is done and handle the next Future. This is where Future interface fails to provide a fluent interface to chain calls and handling errors would open another can of worms.

Fortunately, Java 8 came to the party with a new update. Java 8 introduced a new class called CompletableFuture. CompletableFuture, in my opinion is the second best feature after Streams in Java 8. It is a type of Future which also implements CompletionStage interface. This interface would enable clean way of chaining and handling errors while writing asynchronous code.


package completablefutureexample;
import java.util.Random;
import java.util.concurrent.CompletableFuture;
import java.util.concurrent.ExecutionException;
import java.util.concurrent.ExecutorService;
import java.util.concurrent.Executors;
import java.util.concurrent.Future;
public class App {
public static void main(String[] args) {
CompletableFuture<Integer> completableFuture = new CompletableFuture<>();
//Define your flow
completableFuture.thenApply((integer) -> {
int randomNumber = 0;
try {
randomNumber = generateRandomNumber();
System.out.println("Adding " + integer + " to the random number " + randomNumber);
} catch (InterruptedException e) {
e.printStackTrace();
}
System.out.println(
"Generated random number=" + randomNumber + " from thread : " + Thread.currentThread()
.getName());
return randomNumber + integer;
}).thenApplyAsync(integer -> {
System.out.println("Got result from the first thread.");
return integer + 500;
}).thenAccept(integer -> {
System.out.println("Added 500 to the result. Terminating the completable future.");
});
//Start the processing
completableFuture.complete(10);
}
private static int generateRandomNumber() throws InterruptedException {
int number = new Random().nextInt(100);
System.out.println("Sleeping for " + number + "ms");
Thread.sleep(number);
return number;
}
}

view raw

App.java

hosted with ❤ by GitHub

Lets now walk through what the above code is doing. We are defining a CompletableFuture where we start off by defining the flow, after which we call complete() method to pass in data to the pipeline to eventually pass the result of one operation nicely down the pipeline.

If you have not already observed, you can see that there are different flavors of thenApply method. CompletableFuture has two flavors of each of such methods, where the XXXAsync methods would run the operation on a different thread (By default if you do not specify any ForkJoinPool, it uses the ForkJoinCommonPool)

CompletableFuture also provides a variety of methods to compose, combine two or more CompletableFutures. This provides a very fluent, readable and maintainable asynchronous code.

We barely scraped the surface of CompletableFuture in this post. The motive of this post was to introduce CompletableFuture and see how different it is from Future interface. It would probably make sense to dedicate a whole new post to get more deeply into the capabilities of CompletableFuture. Let see that in a different post.

Standard
java

Install and manage multiple versions of java on your Mac OS X gracefully with jenv

The Only Thing That Is Constant Is Change.
― Heraclitus

With Oracle opting to release for every six months (more info on this here), it’s obvious that we would end up having multiple java versions on our machine. The obvious next challenge would be to manage these installations and not mess up the java installation on our local machine.

TLDR; I have split this post into three parts. Feel free to jump on to any part as per your needs.

Part 1: How to install homebrew and homebrew-cask

Part 2: How to install java using homebrew.

Part 3: How to manage multiple java installations using jenv.


Part 1:

Install Homebrew and Homebrew-cask:

There is an awesome way for Mac users to install and manage their Java installations in a graceful way. Before getting to how to manage multiple versions of Java, let’s get to how to install java on a Mac OS X.

IMHO, if you are going to develop java apps or, to that matter of fact any programming in your Mac, I feel its almost mandatory to have homebrew tool installed on your machine.

If you do not have the tool installed yet, please do visit homebrew’s webpage to know how to install homebrew on your local machine.

Homebrew is what yum is for linux. Its a package manager for Mac OS.

Verify that you have correctly installed homebrew by running the following command.

Screen Shot 2018-03-30 at 6.36.17 PM

Also, while you do this, do install the homebrew-cask by running the following command. (Visit this place to see any other interesting way to install cask).

~> brew tap phinze/homebrew-cask
~> brew install brew-cask

Now you have all the power to install awesome tools from homebrew.


Part 2:

Install Java thru Homebrew

Now all you have to do is to run the following command in your terminal.

Step 1: Verify if you have a java version:

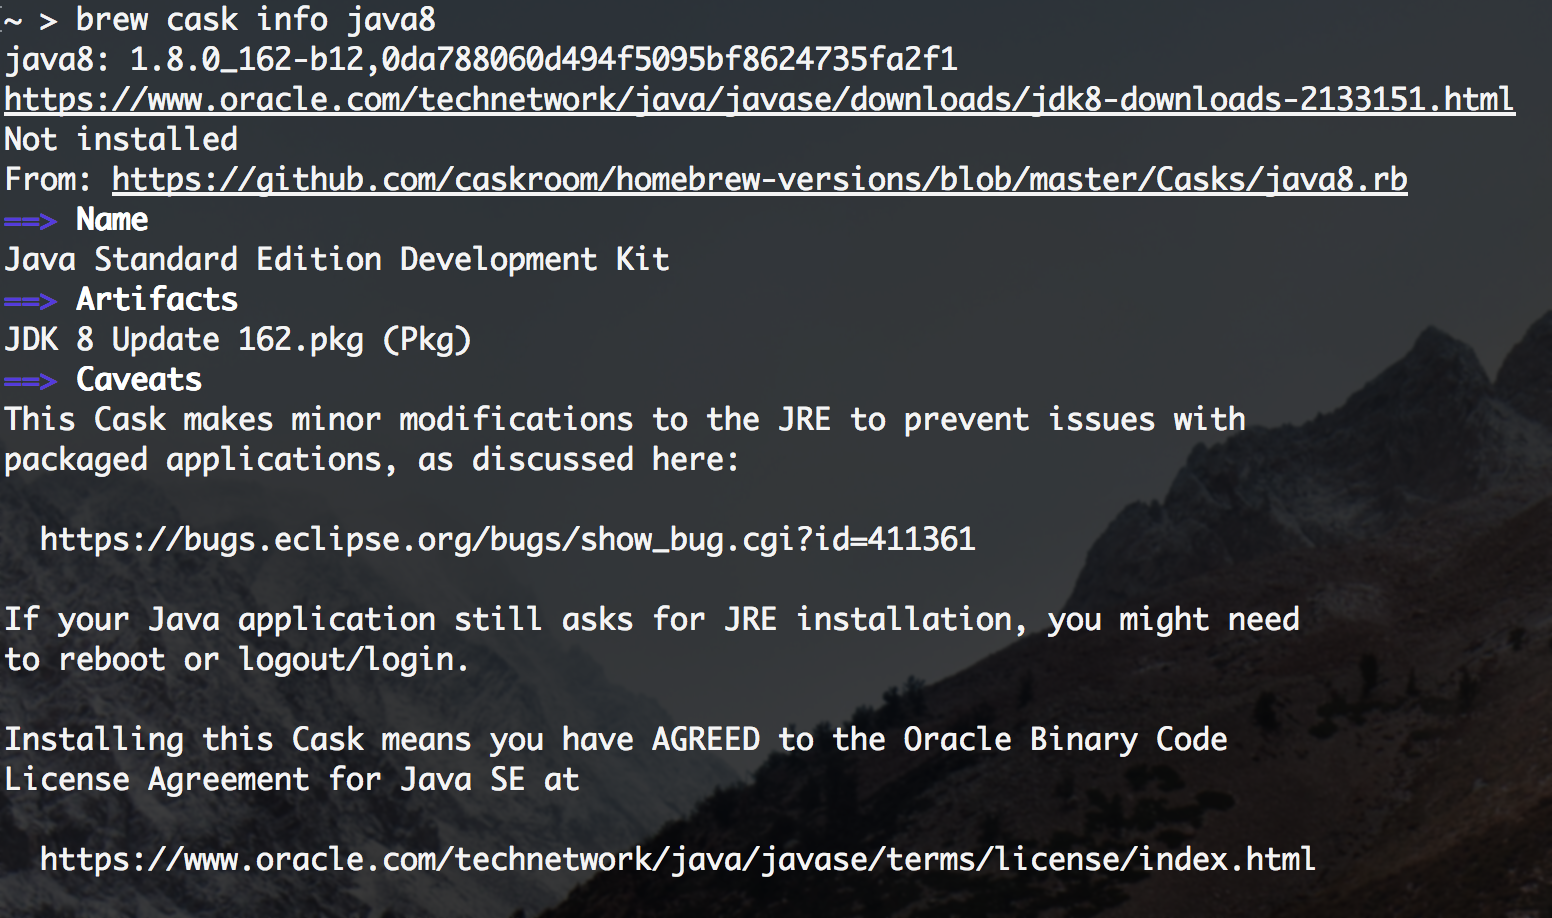
~> brew cask info java8

brew cask info

Observe that the output shows that java8: 1.8.0_162-b12 is not installed.

Step 2: Install java:

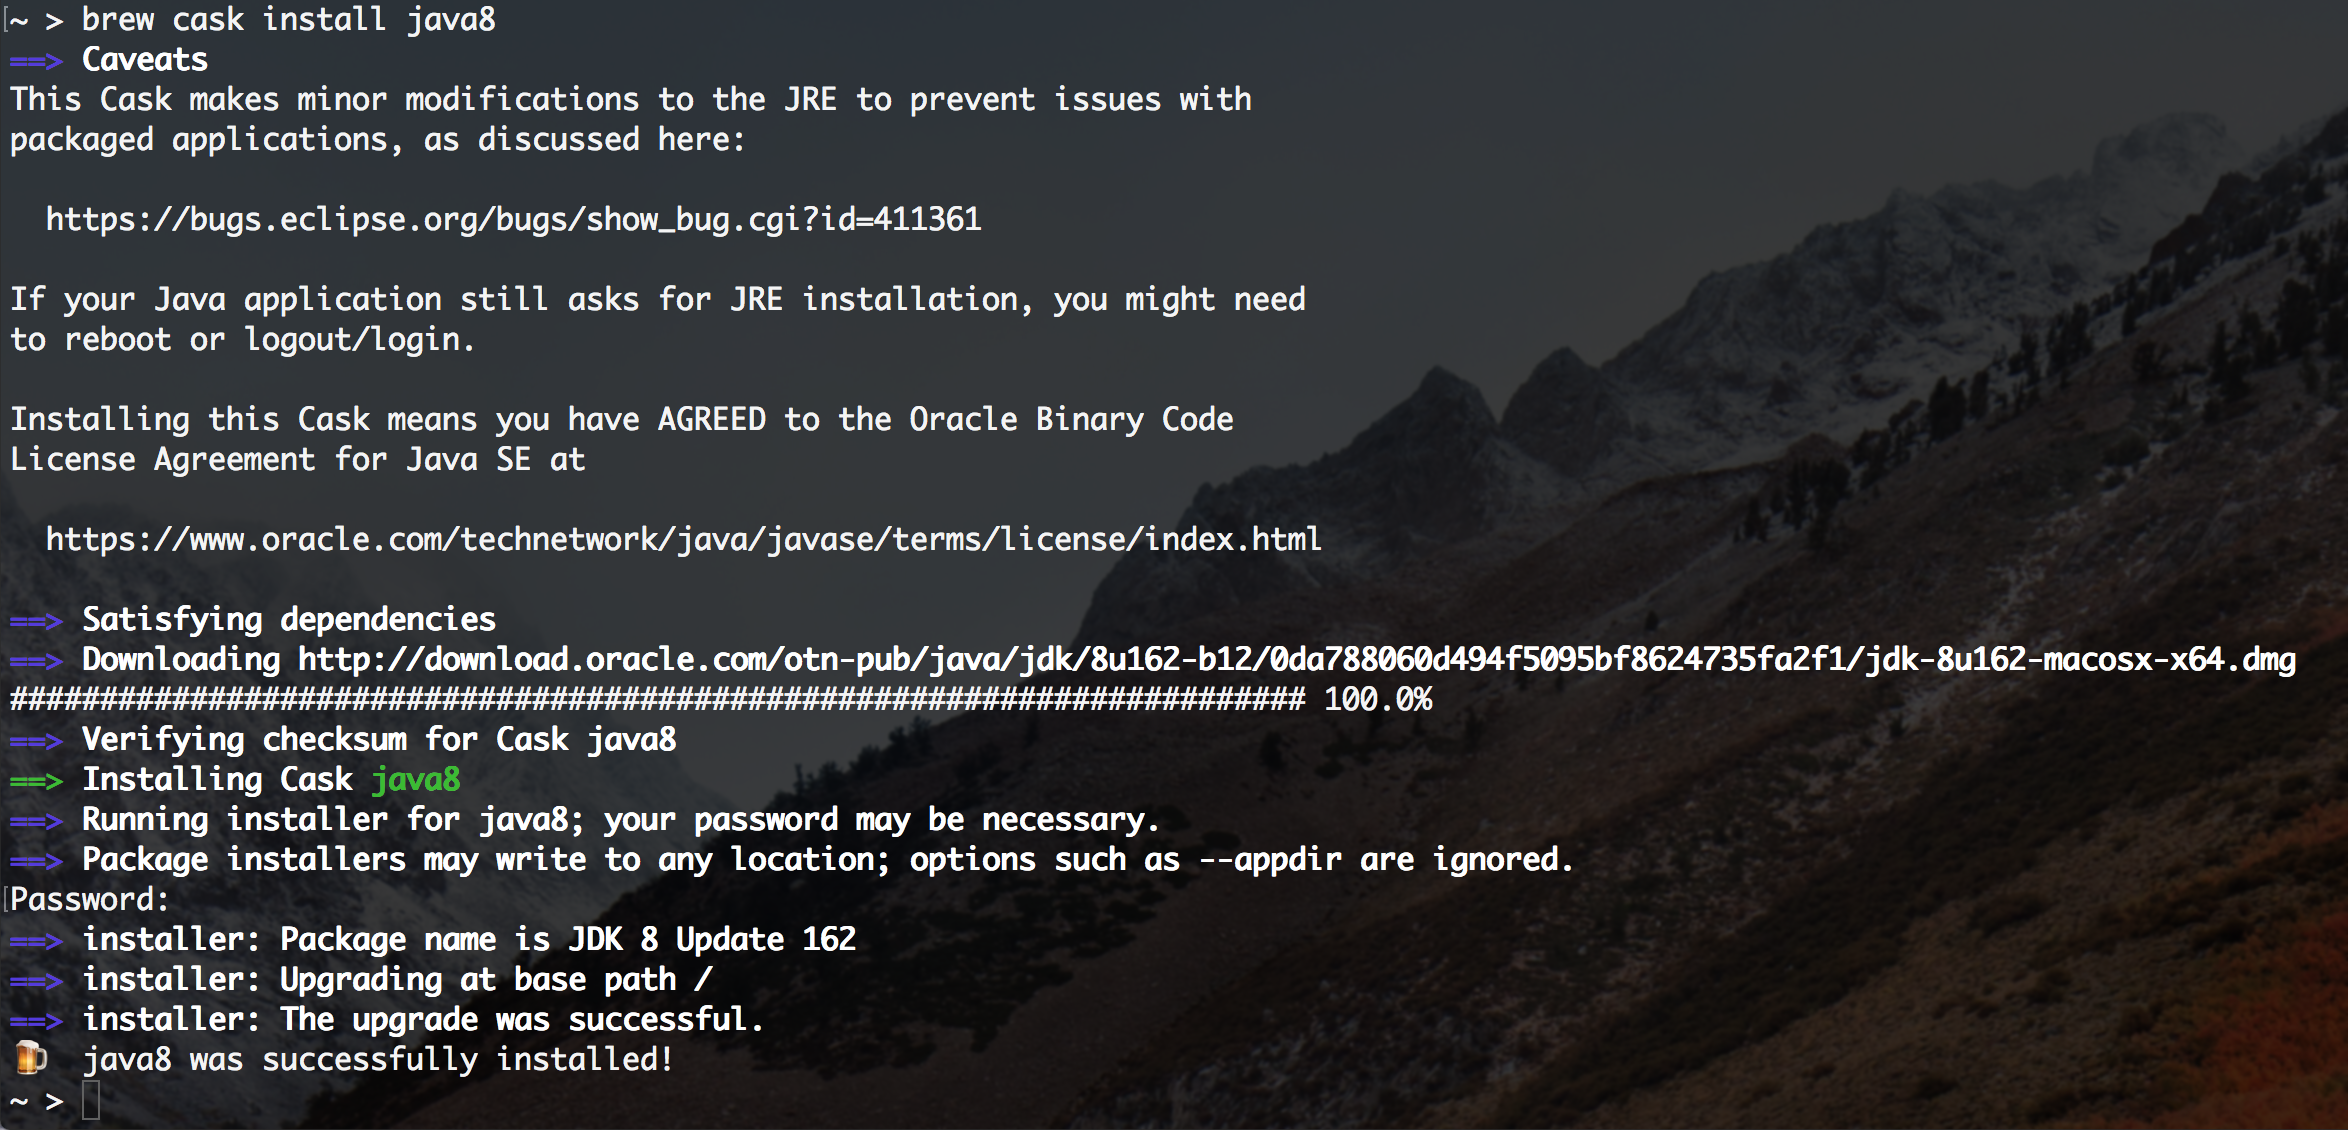
~> brew cask install java8

install java8 using brew

You have now successfully installed java on your Mac.


Part 3:

Install jenv to manage multiple version of java on Mac OS X:

Alright, now that you have java, let’s say within six months from now you get a new release for java. You do not want to upgrade your projects, but still, try out new and cool language features.

Managing multiple java versions might be a nightmare and requires some effort. Luckily, to our rescue is an awesome tool called jenv. Let’s look at how to manage multiple java versions in an awesome way.

jenv is a utility tool that manages multiple versions of java and gives you control to switch java versions with ease.

If you have made it this far, it is assumed that you have installedhomebrew on your machine, so lets get started right away to install jenv.

All you need to install jenv is to run the following command.

~> brew install jenv
~> echo 'eval "$(jenv init -)"' >> ~/.bash_profile

If you see the following result after your,brew install jenv command, then you have successfully installed jenv on your machine.

jenv installation confirmation

Run the following command to add java versions for jenv to manage for you.

~> jenv add /Library/Java/JavaVirtualMachines/jdk1.8.0_162.jdk/Contents/Home/

That’s it, your java version can be managed by jenv now.

PS: You might run into problems with the following error when trying to run the above command.

ln: /Users/your_username/.jenv/versions/oracle64-1.8.0.162: No such file or directory

If you encounter this result when adding your java version, all you need to do is to create a directory .jenv and versions in your home directory and run the add command again.

Once the jenv add command succeeds, you should see a message like this

Add java version to jenv

Boom! done.

If you have multiple java installations on your machine, you would have to add all the java installations to jenv.

jenv provides you different commands to switch java versions based on your needs.

To list all the java installs managed by jenv run:

~> jenv versions
* system (set by /Users/vranganathan/.jenv/version)
1.8
1.8.0.162
9.0
9.0.4
oracle64-1.8.0.162
oracle64-9.0.4

To configure a version:

//Configure globally on your machine
~> jenv global 1.8

//Configure locally per directory
~> jenv local 1.8

//Configure per shell
~> jenv shell 1.8

There are lot more features that jenv offers. You can go thru their documentation briefed in their github page.

Standard