java, spring

Integration graph when using Spring Integration Java DSL

The drawing shows me at a glance what would be spread over ten pages in a book. –Ivan Turgenev

In my recent post on Spring Integration: A hands on introduction, I have a diagram that illustrates a spring-integration flow. I feel that such an illustration, gives us an awesome way to both document your flow and act as a dashboard to look thru when the spring-integration project has been deployed to have near real-time stats on what is the load on a channel, speed thru which your messages are flowing thru, etc.

If you have used spring-integration using XML config, the IDE‘s would have this straight out of the box (Both in STS Eclipse & IntelliJ Idea).

Integration flow graphs for spring-integration project in Eclipse and IntelliJ IDEA IDE's

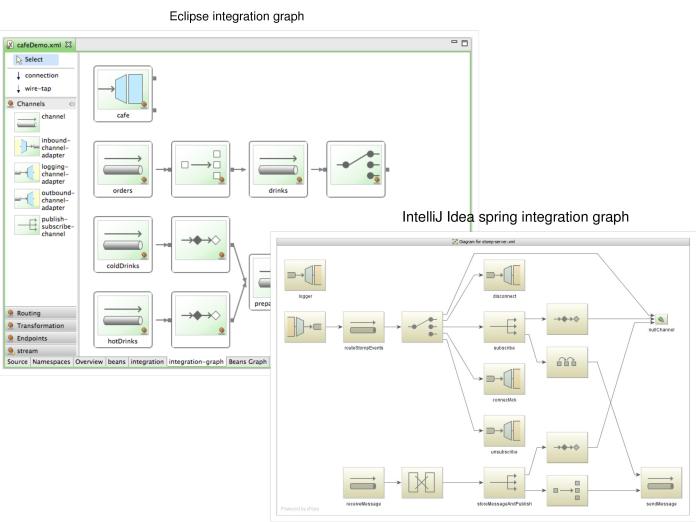
Integration flow graphs for spring-integration project in Eclipse and IntelliJ IDEA IDE‘s

Well, if you have gone thru that post, you would have noticed that we did not use XML configs for the project, instead, we used the new and cool Java DSL to define out flow. One downside of this I feel to this approach is that, since this whole Java DSL way of defining the flow is fairly new and since our flows get generated dynamically when spring builds up its context, we have no plugins for any IDE‘s (At-least, none to my knowledge) that will give us this integration-graph out of the box.

Fortunately, spring-integration folks have not taken this lightly, we do have a way to visualize the flows when using spring-integration with Java DSL. Its not too straight-forward, but its not difficult either. Let’s today see how to visualize your integration-flows using the project, Spring-Flo.

The link for that project will take you to the angular-1.x branch of the project. That is because, currently the whole project is in the process of migration to angular 4/5. Hence the stable version that we can use in the meantime is the one that is in the angular-1.x branch. I will update this post if I find a newer stable version.

So, that being said, we need to use this external project in-order to visualize your flow, which is not too bad I feel (IMO, it is better than not having any means to visualize your flow). Also, I feel it would be giving more cleaner way to have a dashboard kind of view to see how are things going in real-time. So, I like the idea of having this as a different project.

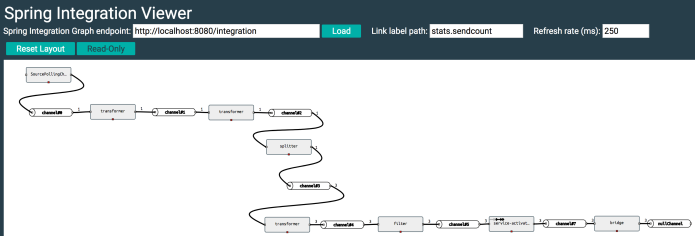
Let’s right away jump into how to configure your spring-integration project to use spring-flo project. To begin with, this is how spring-flo project will be able to generate the integration-graph for you.

Your integration project will expose an endpoint (/integration) which will give the near real-time stats of your integration components (Channels, Service Activators, etc.). This is just a plain JSON response. The interesting part is that, spring-flo project will latch on to this endpoint, and will provide you with an interesting visualization of the JSON reply.

Dependencies needed:

  1. Make the project a web-based one, by including the spring-boot-starter-web. This will give you access to the /integration endpoint when your project boots up.
  2. Include the spring-integration-http dependency to use the @EnableIntegrationGraphController on your application class.


<!– For exposing the /integration endpoint –>
<dependency>
<groupId>org.springframework.boot</groupId>
<artifactId>spring-boot-starter-web</artifactId>
</dependency>
<!– For @EnableIntegrationGraphController annotation –>
<dependency>
<groupId>org.springframework.integration</groupId>
<artifactId>spring-integration-http</artifactId>
</dependency>

view raw

pom.xml

hosted with ❤ by GitHub

Code configuration for your spring-integration project:

  1. Add the @EnableIntegrationGraphController to your application class.
  2. You need to allow access for spring-flo application to access the endpoint /integration by specifying the allowedOrigins on your annotation.


@SpringBootApplication
@EnableIntegrationGraphController(allowedOrigins = "http://localhost:8082&quot;)
public class Application {
public static void main(String[] args) {
SpringApplication.run(Application.class, args);
}
}

Here in this example, I am planning to run the spring-flo application on the same machine in the port 8082, so I’m just specifying that when I’m configuring my integration project.

That’s all you have to do to your spring-integration project.

Running spring-flo project:

  1. Clone the spring-flo project to your machine.
  2. Checkout to the angular-1.x branch
  3. Start your spring-integration project.
  4. Run the spring-flo/samples/spring-flo-si project on 8082 since our spring-integration project will be expecting spring-flo to be running on port 8082.
  5. Go to localhost:/8082 and click on Load button to load your integration flow graph.

Spring integration flo diagram

It is not pretty straight-forward, but still, we have something to work on until spring team would give a better solution in the future which I’m pretty confident they would. Until then, we have this web application that provides a wonderful way to watch our integration-flows.

Standard
java, spring

Spring Integration: A hands on introduction

Designing software with high cohesion and loose coupling is something many software teams strive for. While, there are different strategies to achieve this, one common approach many take is to use message-driven architecture.

In a nutshell, message-driven architecture deals with interactions among different modules in a service/app communicate using messages shared thru a common broker. If you want to get to know more about the perks of using a message-driven architecture, I would highly recommend that you read “Enterprise Integration Patterns” by Bobby Woolf and Gregor Hohpe. This book exposes several concepts and design strategies, that are widely recognized and practiced in various enterprises. There are multiple open source implementations libraries for this book. Most widely used ones are Apache Camel and Spring Integration.

In this post, lets see how to easily set up a spring-integration project. To keep it simple, let create an app that facilitates integration between filesystem and a database. For this exercise, lets imagine we need to enter records to a database and the client would only give us a pipe-delimited file. Our intent is to consume this file, read the records and write it to a database. This is clearly not really a huge integration problem to solve, but for simplicity sake lets see how spring-integration would help us achieve this integration.

Steps :

  1. Keep polling a directory at a fixed rate/time interval
  2. Read every new file (preferably with a pattern) that is dropped in the directory
  3. Process every line and transform the line to create a record to persist
  4. Persist records to a data-store

Now, lets create a spring boot application using spring initializr project with the following dependencies.

spring initializr project dependencies for spring integration

I used the following dependencies while bootstrapping the spring boot project.


<dependencies>
<!– Spring starter dependencies –>
<dependency>
<groupId>org.springframework.boot</groupId>
<artifactId>spring-boot-starter-data-jpa</artifactId>
</dependency>
<dependency>
<groupId>org.springframework.boot</groupId>
<artifactId>spring-boot-starter-integration</artifactId>
</dependency>
<dependency>
<groupId>org.springframework.boot</groupId>
<artifactId>spring-boot-starter-web</artifactId>
</dependency>
<!– Spring integration dependencies –>
<dependency>
<groupId>org.springframework.integration</groupId>
<artifactId>spring-integration-http</artifactId>
</dependency>
<dependency>
<groupId>org.springframework.integration</groupId>
<artifactId>spring-integration-file</artifactId>
</dependency>
<!– Database dependency –>
<dependency>
<groupId>com.h2database</groupId>
<artifactId>h2</artifactId>
<scope>runtime</scope>
</dependency>
<!– Util dependencies –>
<dependency>
<groupId>org.projectlombok</groupId>
<artifactId>lombok</artifactId>
<optional>true</optional>
</dependency>
</dependencies>

Note that I am using spring-integration-file and spring-integration-http that do not come bundled with spring-boot-starter-integration. Also, to keep it simple, I am using an in-memory h2 database to persist the data. I am using lombok to avoid manually writing getters and setters for the model class. I will elaborate in more depth on how lombok is beautifying java classes in a different post.

Now, the ground work is all laid. Let’s get started to make stuff work with these dependencies.

All we have to do now is to define our spring-integration flow and let spring do the magic for us.


@Configuration
public class IntegrationFlowConfiguration {
@Autowired
PersonRepository personRepository;
@Bean
public IntegrationFlow fileInputFlow() {
return IntegrationFlows.from(
//Setting up the inbound adapter for the flow
Files
.inboundAdapter(new File("/tmp/in"))
.autoCreateDirectory(true)
.patternFilter("*.txt"), p -> p.poller(Pollers.fixedDelay(10, TimeUnit.SECONDS)
.errorChannel(MessageChannels.direct().get())))
// Transform the file content to string
.transform(Files.toStringTransformer())
//Transform the file content to list of lines in the file
.<String, List<String>>transform(wholeText -> Arrays.asList(wholeText.split(Pattern.quote("\n"))))
//Split the list to a single person record line
.split()
//Transform each line in the file and map to a Person record
.<String, Person>transform(eachPersonText -> {
List<String> tokenizedString = Arrays.asList(eachPersonText.split(Pattern.quote("|")));
try {
return Person.builder()
.personId(Long.parseLong(tokenizedString.get(0).trim()))
.personName(tokenizedString.get(1).trim())
.personPhoneNumber(tokenizedString.get(2).trim())
.build();
} catch (Exception e) {
return null;
}
})
.filter(Objects::nonNull)
// Save the record to the database.
.handle((GenericHandler<Person>) (personRecordToSave, headers) -> personRepository
.save(personRecordToSave))
.log(Level.INFO)
.get();
}
}

Let us now go thru what are we doing by analyzing the code.

If you are familiar with spring framework in general, the above code might not seem very unfamiliar to you. All we are doing is to initialize a bean in a configuration class.

It is interesting on what spring integration is doing for us behind the scenes when initializing the context. Spring-integration will collect all the IntegrationFlow beans, pass them through IntegrationFlowBeanPostProcessor, which creates the required components for the integration. This enables a clean way to let us focus on the flow rather than defining the integration components. All the logic that is going in as the business logic could very well sit inside a lambda or be defined as a POJO and be used inside the flow.

It is important to note that we use quite a few enterprise integration patterns terminology here while defining the IntegrationFlow. Let us take a quick birds-eye view on what they mean.

  1. Message Channel
  2. Inbound Adapter
  3. Transform
  4. Split
  5. Filter
  6. Handler

If you haven’t already noticed, all the other components/terminology I listed above are part of the IntegrationFlow bean, except the first one; MessageChannel. That is because, as we discussed above when talking about message-driven architecture, every component defined above collaborate with each other thru a message channel. You could imagine these message channels like a queue to which a publisher publishes data to, and a consumer which consumes that data. If you are still confused, this diagram could help you visualize the role of MessageChannels.

Spring integration flo diagram

The above diagram is actually the integration flow diagram for the integration flow we defined. If you observe, there is a small pipe between each component, that pipe is the implicit message channel that spring-integration creates for us to pass down the data in the pipeline.

Adapter:

Adapters are an enterprise integration component that act as a message endpoint that enables connecting a single sender or receiver to a MessageChannel. Here in our example, we are using an inbound-adapter to keep polling a directory for every 10 seconds to see if there is any new files with extensions in the directory. Spring-integration provides inbound and outbound adapters for solving common integration endpoints. We are using a file-inbound-adapter in the example.

Transformer:

Transform component is very straightforward. This component will take in an input and pass out a transformed message as output.

Splitter:

Splitter will take in a list as input and split the items inside that list to pass items, one by one as a separate message down the flow. In our case we would want to split list of person records as lines of text to single line and pass it down the flow to enter one record at a time.

Filter:

Filter is also very straightforward, as it will just decide on whether to pass the message down the pipeline or not, based on a predicate test. In our case, the predicate is that the object should not be a null.

Handler:

A message handlers just reads messages from a message channel and decides on how to handle the message. Usually handlers are the components that occur at the end of a pipeline. It is optional to pass the data down to another channel. If you do not specify channel, the message will be discarded by passing the message to a nullChannel.

These components are just those that we encountered in this IntegrationFlow, there are many other enterprise integration components. To read more about other components, go thru the documentation of spring-integration project here.

Getting back to our example, to make our integration kick off, all I have to do is to drop a file with an extension of “.txt” into the /tmp/in directory (Since I’m polling on to that directory. Of course this could be passed in as a property value as well).

Contents of the file should look something similar to the following:

1 | person1 | 1234567890
2 | person2 | 3214325345
3 | person3 | 3123322132

This text file will be consumed and will get persisted as person records into our in-memory data-store.

Screen Shot 2018-04-17 at 2.54.01 PM

Clearly, I did not go thru every minute detail on setting up the project. If you want to take a more finer look at the project, you can refer this project on github here.

Standard