java, spring

Say hi to Spring Boot!

I am here after a long time to pen down some thoughts for just getting back to the habit of writing. I hope I’ll be able to continue sharing my thoughts more frequently.

Since its been a while, I thought I’ll share something that is not too complicated as it might make it tough for me to get out of my inertia. So, I am going to share an opinionated way of bootstrapping a light-weight java web-application.

With new languages and features coming out for public use every now and then, it is high time that legacy languages such as Java (I may no longer be able to claim this, as Java is quickly catching up to the latests trends with more sexy language features with the new java release cycle) catch up to speed with cool features other languages/frameworks offer. There were times, when I used to spend a whole day just to kick-start a basic skeleton web app with a ton of configuration files and downloading a cryptic application server and copying my class files to weird locations. But with a lot of frameworks that support java integration, things have gotten much better.

There’s plethora of easy-to-use frameworks that has made Java backend/full-stack engineer’s life a lot better. But I’d like to share my experience on how easy it is to setup a skeleton web-app using my favorite Springboot (Although I use dropwizard for my day-to-day activities at my work for various reasons, Spring has always been my favorite framework of choice ever since my revelation about things getting easier in Java).

I can keep blabbering about Spring framework forever. But I prefer to see things in action. So let me start with my rambling!

Say hi to Initializr!

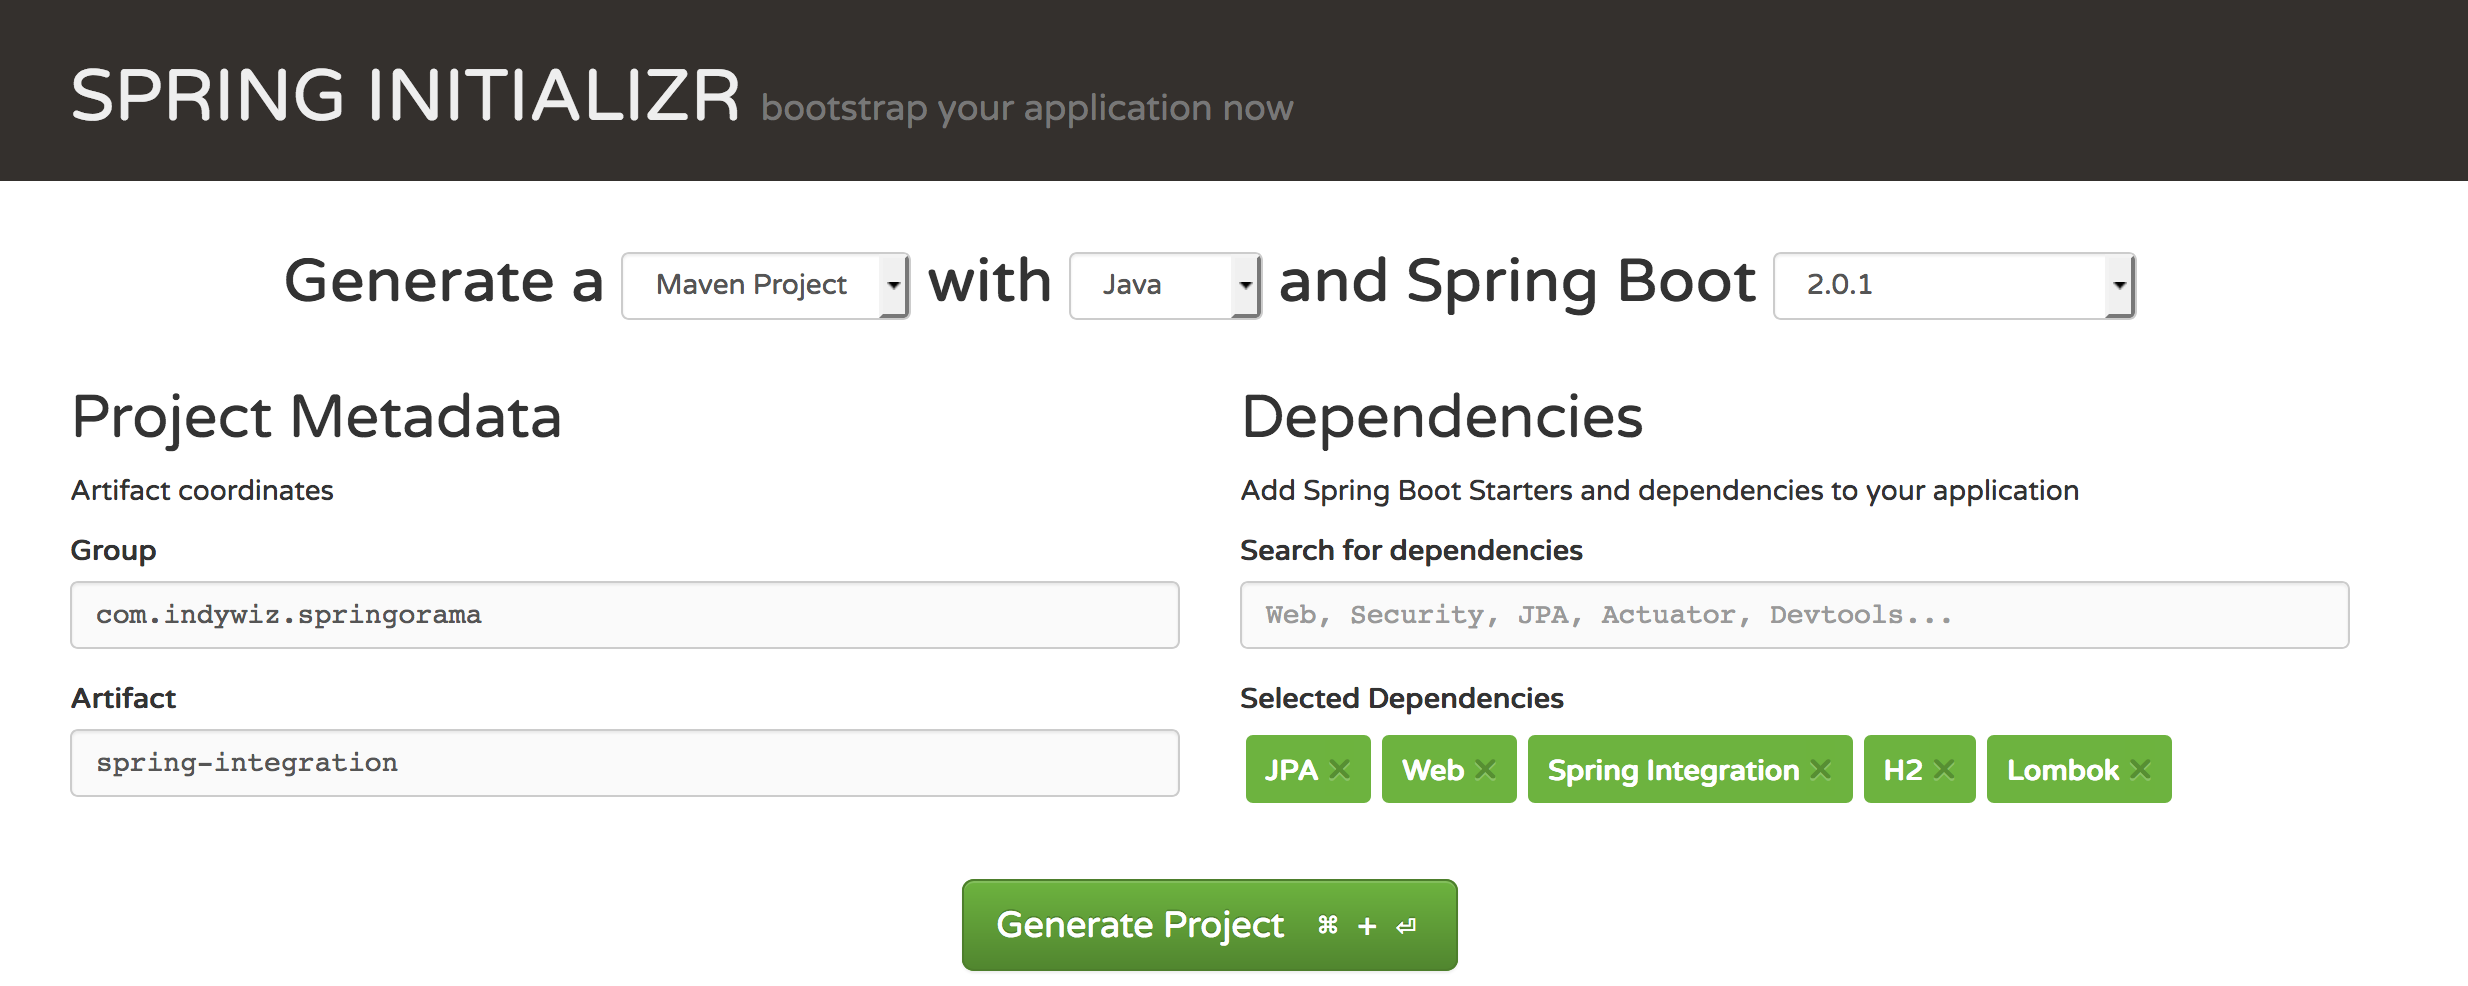
The biggest pain for getting started with any framework is actually “getting started“! With spring boot, getting started is as easy as clicking a few buttons. Don’t believe me, let me introduce you to spring initializr.

Spring initializr page

For setting up a spring-boot project using spring initializr, you need to;

  1. Setup your build tool (We are using maven as part of this post) as described here (Ignore if you already have maven installed)
  2. Go to https://start.spring.io/
  3. Fill a form to enter metadata about your project.
  4. Decide on dependencies to add to your project (I did not add any for this demo).
  5. Click on generate!

Well, once we extract the zip file, we need to open it using any IDE (I am using IntelliJ here but I wouldn’t expect any issues with Eclipse, Netbeans, etc). Here is how your extracted project would look like.

Extracted project structure

You can find this as part of my commit here in github if you are following along with me. All you now need to do is to build the project and run the DemoApplication.java file. If you like to run it from terminal like I prefer, run the following command from your root directory.

mvn spring-boot:run

Run using maven

If you observe now, the app starts and shuts down immediately, let’s fix that next.

But where’s the web app?

Like I said, since we did not choose any dependency in the spring initializr page. Spring initializr assumed that we were not building a web-app and gave us the bare minimum configuration for running our app.

There is a reason why I did not choose any dependency when I bootstrapped the app. Often, when we start with an app, we do not know the exact set of dependencies we’d need to start off with. It is crucial for us to know how to add additional dependencies after we started working on the app. Easy way would be to click on the Explore button on the spring initializer web-page by choosing your dependency. Let me show how easy it is in the following gif.

Copying the web starter dependency

Now that you’ve copied the required dependency to power a web app, let’s go ahead and change our pom.xml so we could pull in the needed dependencies for bootstrapping a web-app.

Your pom file should look like my pom file in this commit.

Great! now we need to just add some magic and we are all set. For every web-app (Restful web app), you need the following logical entities for defining your restful web service;

  1. HTTP method (Defines the type of operation)
  2. Endpoint name (Defines a name for the operation)
  3. Parameters & Request payload (Defines user input for processing)
  4. Response (Defines how the response should look like)

These four things are what we are going to define in our DemoApplication.java.

Your DemoApplication.java should look like the one I have in this commit here.

That’s it! we are done with the code changes. Build your project and run it using the same command mvn spring-boot:run and now you should logs similar to the below screenshot.

Lets now open a browser and navigate to the following url

http://localhost:8080/sayHi?name=springboot

This should print the text Hi from springboot in your browser.

Congratulations your spring-boot app is ready and running with absolutely no configuration and no external server setup.

I know this is a lot of magic, but we’ve barely scratched the surface. There is a LOT of magic going on behind the scenes. I will attempt my take on it as part of a separate post in future. So long!

Standard
java, spring

Spring Integration: A hands on introduction

Designing software with high cohesion and loose coupling is something many software teams strive for. While, there are different strategies to achieve this, one common approach many take is to use message-driven architecture.

In a nutshell, message-driven architecture deals with interactions among different modules in a service/app communicate using messages shared thru a common broker. If you want to get to know more about the perks of using a message-driven architecture, I would highly recommend that you read “Enterprise Integration Patterns” by Bobby Woolf and Gregor Hohpe. This book exposes several concepts and design strategies, that are widely recognized and practiced in various enterprises. There are multiple open source implementations libraries for this book. Most widely used ones are Apache Camel and Spring Integration.

In this post, lets see how to easily set up a spring-integration project. To keep it simple, let create an app that facilitates integration between filesystem and a database. For this exercise, lets imagine we need to enter records to a database and the client would only give us a pipe-delimited file. Our intent is to consume this file, read the records and write it to a database. This is clearly not really a huge integration problem to solve, but for simplicity sake lets see how spring-integration would help us achieve this integration.

Steps :

  1. Keep polling a directory at a fixed rate/time interval
  2. Read every new file (preferably with a pattern) that is dropped in the directory
  3. Process every line and transform the line to create a record to persist
  4. Persist records to a data-store

Now, lets create a spring boot application using spring initializr project with the following dependencies.

spring initializr project dependencies for spring integration

I used the following dependencies while bootstrapping the spring boot project.


<dependencies>
<!– Spring starter dependencies –>
<dependency>
<groupId>org.springframework.boot</groupId>
<artifactId>spring-boot-starter-data-jpa</artifactId>
</dependency>
<dependency>
<groupId>org.springframework.boot</groupId>
<artifactId>spring-boot-starter-integration</artifactId>
</dependency>
<dependency>
<groupId>org.springframework.boot</groupId>
<artifactId>spring-boot-starter-web</artifactId>
</dependency>
<!– Spring integration dependencies –>
<dependency>
<groupId>org.springframework.integration</groupId>
<artifactId>spring-integration-http</artifactId>
</dependency>
<dependency>
<groupId>org.springframework.integration</groupId>
<artifactId>spring-integration-file</artifactId>
</dependency>
<!– Database dependency –>
<dependency>
<groupId>com.h2database</groupId>
<artifactId>h2</artifactId>
<scope>runtime</scope>
</dependency>
<!– Util dependencies –>
<dependency>
<groupId>org.projectlombok</groupId>
<artifactId>lombok</artifactId>
<optional>true</optional>
</dependency>
</dependencies>

Note that I am using spring-integration-file and spring-integration-http that do not come bundled with spring-boot-starter-integration. Also, to keep it simple, I am using an in-memory h2 database to persist the data. I am using lombok to avoid manually writing getters and setters for the model class. I will elaborate in more depth on how lombok is beautifying java classes in a different post.

Now, the ground work is all laid. Let’s get started to make stuff work with these dependencies.

All we have to do now is to define our spring-integration flow and let spring do the magic for us.


@Configuration
public class IntegrationFlowConfiguration {
@Autowired
PersonRepository personRepository;
@Bean
public IntegrationFlow fileInputFlow() {
return IntegrationFlows.from(
//Setting up the inbound adapter for the flow
Files
.inboundAdapter(new File("/tmp/in"))
.autoCreateDirectory(true)
.patternFilter("*.txt"), p -> p.poller(Pollers.fixedDelay(10, TimeUnit.SECONDS)
.errorChannel(MessageChannels.direct().get())))
// Transform the file content to string
.transform(Files.toStringTransformer())
//Transform the file content to list of lines in the file
.<String, List<String>>transform(wholeText -> Arrays.asList(wholeText.split(Pattern.quote("\n"))))
//Split the list to a single person record line
.split()
//Transform each line in the file and map to a Person record
.<String, Person>transform(eachPersonText -> {
List<String> tokenizedString = Arrays.asList(eachPersonText.split(Pattern.quote("|")));
try {
return Person.builder()
.personId(Long.parseLong(tokenizedString.get(0).trim()))
.personName(tokenizedString.get(1).trim())
.personPhoneNumber(tokenizedString.get(2).trim())
.build();
} catch (Exception e) {
return null;
}
})
.filter(Objects::nonNull)
// Save the record to the database.
.handle((GenericHandler<Person>) (personRecordToSave, headers) -> personRepository
.save(personRecordToSave))
.log(Level.INFO)
.get();
}
}

Let us now go thru what are we doing by analyzing the code.

If you are familiar with spring framework in general, the above code might not seem very unfamiliar to you. All we are doing is to initialize a bean in a configuration class.

It is interesting on what spring integration is doing for us behind the scenes when initializing the context. Spring-integration will collect all the IntegrationFlow beans, pass them through IntegrationFlowBeanPostProcessor, which creates the required components for the integration. This enables a clean way to let us focus on the flow rather than defining the integration components. All the logic that is going in as the business logic could very well sit inside a lambda or be defined as a POJO and be used inside the flow.

It is important to note that we use quite a few enterprise integration patterns terminology here while defining the IntegrationFlow. Let us take a quick birds-eye view on what they mean.

  1. Message Channel
  2. Inbound Adapter
  3. Transform
  4. Split
  5. Filter
  6. Handler

If you haven’t already noticed, all the other components/terminology I listed above are part of the IntegrationFlow bean, except the first one; MessageChannel. That is because, as we discussed above when talking about message-driven architecture, every component defined above collaborate with each other thru a message channel. You could imagine these message channels like a queue to which a publisher publishes data to, and a consumer which consumes that data. If you are still confused, this diagram could help you visualize the role of MessageChannels.

Spring integration flo diagram

The above diagram is actually the integration flow diagram for the integration flow we defined. If you observe, there is a small pipe between each component, that pipe is the implicit message channel that spring-integration creates for us to pass down the data in the pipeline.

Adapter:

Adapters are an enterprise integration component that act as a message endpoint that enables connecting a single sender or receiver to a MessageChannel. Here in our example, we are using an inbound-adapter to keep polling a directory for every 10 seconds to see if there is any new files with extensions in the directory. Spring-integration provides inbound and outbound adapters for solving common integration endpoints. We are using a file-inbound-adapter in the example.

Transformer:

Transform component is very straightforward. This component will take in an input and pass out a transformed message as output.

Splitter:

Splitter will take in a list as input and split the items inside that list to pass items, one by one as a separate message down the flow. In our case we would want to split list of person records as lines of text to single line and pass it down the flow to enter one record at a time.

Filter:

Filter is also very straightforward, as it will just decide on whether to pass the message down the pipeline or not, based on a predicate test. In our case, the predicate is that the object should not be a null.

Handler:

A message handlers just reads messages from a message channel and decides on how to handle the message. Usually handlers are the components that occur at the end of a pipeline. It is optional to pass the data down to another channel. If you do not specify channel, the message will be discarded by passing the message to a nullChannel.

These components are just those that we encountered in this IntegrationFlow, there are many other enterprise integration components. To read more about other components, go thru the documentation of spring-integration project here.

Getting back to our example, to make our integration kick off, all I have to do is to drop a file with an extension of “.txt” into the /tmp/in directory (Since I’m polling on to that directory. Of course this could be passed in as a property value as well).

Contents of the file should look something similar to the following:

1 | person1 | 1234567890
2 | person2 | 3214325345
3 | person3 | 3123322132

This text file will be consumed and will get persisted as person records into our in-memory data-store.

Screen Shot 2018-04-17 at 2.54.01 PM

Clearly, I did not go thru every minute detail on setting up the project. If you want to take a more finer look at the project, you can refer this project on github here.

Standard
spring

How to get rid of AmazonClientException when using Spring Cloud AWS with spring-boot

I was recently trying to list number of files from S3, and read those files one by one in a service. For doing this I was using spring-boot 2.0.0.RELEASE, spring-cloud-starter-aws (Edgware.SR2) library for auto-configuring my credentials.

I configured my credentials by following the official documentation. You can give that a read in your free time. TLDR; all we have to do if we are using spring-boot to auto-configure your Amazon S3 client is to populate the following properties in your applications.properties or application.yaml file.

cloud.aws.region.static
cloud.aws.credentials.secretKey
cloud.aws.credentials.accessKey

Once you configure these properties, spring-boot should auto-configure aws client for you. But this did not happen for me. When I have these properties filled out, and run the project, I got the following exception.

Caused by: java.lang.NoClassDefFoundError: com/amazonaws/AmazonClientException
	at org.springframework.cloud.aws.context.annotation.OnAwsCloudEnvironmentCondition.matches(OnAwsCloudEnvironmentCondition.java:37) ~[spring-cloud-aws-context-1.2.2.RELEASE.jar:1.2.2.RELEASE]
	at org.springframework.context.annotation.ConditionEvaluator.shouldSkip(ConditionEvaluator.java:109) ~[spring-context-5.0.4.RELEASE.jar:5.0.4.RELEASE]
	at org.springframework.context.annotation.ConfigurationClassParser.processConfigurationClass(ConfigurationClassParser.java:217) ~[spring-context-5.0.4.RELEASE.jar:5.0.4.RELEASE]
	at org.springframework.context.annotation.ConfigurationClassParser.processImports(ConfigurationClassParser.java:606) ~[spring-context-5.0.4.RELEASE.jar:5.0.4.RELEASE]
	... 14 common frames omitted
Caused by: java.lang.ClassNotFoundException: com.amazonaws.AmazonClientException
	at java.net.URLClassLoader.findClass(URLClassLoader.java:381) ~[na:1.8.0_152]
	at java.lang.ClassLoader.loadClass(ClassLoader.java:424) ~[na:1.8.0_152]
	at sun.misc.Launcher$AppClassLoader.loadClass(Launcher.java:338) ~[na:1.8.0_152]
	at java.lang.ClassLoader.loadClass(ClassLoader.java:357) ~[na:1.8.0_152]
	... 18 common frames omitted

For some reason, spring-boot latest version does not go hand in hand with spring-cloud-dependencies. I tried downgrading spring-boot version and use 1.5.9.RELEASE but then didn’t end up solving the problem. I found out that the problem was that the amazon-java-aws-core library had an upgrade and spring does not handle that well enough, which causes the application to fail miserably at runtime. All I had to do was to downgrade the amazon-java-aws-core library.

spring-cloud-starter-aws (Edgware.SR2) uses amazon-java-aws-core version 1.11.125 which was causing the AmazonClientException. I had to change the following to my pom file.

<!-- Exclude aws-java-sdk-core -->
<dependency>
<groupId>org.springframework.cloud</groupId>
<artifactId>spring-cloud-starter-aws</artifactId>
<exclusions>
<exclusion>
<groupId>com.amazonaws</groupId>
<artifactId>aws-java-sdk-core</artifactId>
</exclusion>
</exclusions>
</dependency>
<!-- Include the right version of the dependency -->
<dependency>
<groupId>com.amazonaws</groupId>
<artifactId>aws-java-sdk-core</artifactId>
<version>1.11.106</version>
</dependency>
view raw pom.xml hosted with ❤ by GitHub
This will fix the AmazonClientException and enables spring-cloud-starter-aws to auto-configure the AmazonS3 client.

It is as simple as autowiring your ResourcePatternResolver bean and using it to list all the objects inside the bucket.


@Autowired
private ResourcePatternResolver resourcePatternResolver;

public List listS3Files(String bucketName) throws IOException {
  final Resource[] resources = resourcePatternResolver
      .getResources("s3://" + bucketName + "/*.xml");

  return Arrays.stream(resources).map(
      resource -> {
        try {
          return resource.getURL().toExternalForm();
        } catch (IOException e) {
          throw new RuntimeException(e);
        }
      }
  ).collect(Collectors.toList());
}

This code example as a project is pushed to my GitHub. You can find the project here.

Standard