java, spring

Say hi to Spring Boot!

I am here after a long time to pen down some thoughts for just getting back to the habit of writing. I hope I’ll be able to continue sharing my thoughts more frequently.

Since its been a while, I thought I’ll share something that is not too complicated as it might make it tough for me to get out of my inertia. So, I am going to share an opinionated way of bootstrapping a light-weight java web-application.

With new languages and features coming out for public use every now and then, it is high time that legacy languages such as Java (I may no longer be able to claim this, as Java is quickly catching up to the latests trends with more sexy language features with the new java release cycle) catch up to speed with cool features other languages/frameworks offer. There were times, when I used to spend a whole day just to kick-start a basic skeleton web app with a ton of configuration files and downloading a cryptic application server and copying my class files to weird locations. But with a lot of frameworks that support java integration, things have gotten much better.

There’s plethora of easy-to-use frameworks that has made Java backend/full-stack engineer’s life a lot better. But I’d like to share my experience on how easy it is to setup a skeleton web-app using my favorite Springboot (Although I use dropwizard for my day-to-day activities at my work for various reasons, Spring has always been my favorite framework of choice ever since my revelation about things getting easier in Java).

I can keep blabbering about Spring framework forever. But I prefer to see things in action. So let me start with my rambling!

Say hi to Initializr!

The biggest pain for getting started with any framework is actually “getting started“! With spring boot, getting started is as easy as clicking a few buttons. Don’t believe me, let me introduce you to spring initializr.

Spring initializr page

For setting up a spring-boot project using spring initializr, you need to;

  1. Setup your build tool (We are using maven as part of this post) as described here (Ignore if you already have maven installed)
  2. Go to https://start.spring.io/
  3. Fill a form to enter metadata about your project.
  4. Decide on dependencies to add to your project (I did not add any for this demo).
  5. Click on generate!

Well, once we extract the zip file, we need to open it using any IDE (I am using IntelliJ here but I wouldn’t expect any issues with Eclipse, Netbeans, etc). Here is how your extracted project would look like.

Extracted project structure

You can find this as part of my commit here in github if you are following along with me. All you now need to do is to build the project and run the DemoApplication.java file. If you like to run it from terminal like I prefer, run the following command from your root directory.

mvn spring-boot:run

Run using maven

If you observe now, the app starts and shuts down immediately, let’s fix that next.

But where’s the web app?

Like I said, since we did not choose any dependency in the spring initializr page. Spring initializr assumed that we were not building a web-app and gave us the bare minimum configuration for running our app.

There is a reason why I did not choose any dependency when I bootstrapped the app. Often, when we start with an app, we do not know the exact set of dependencies we’d need to start off with. It is crucial for us to know how to add additional dependencies after we started working on the app. Easy way would be to click on the Explore button on the spring initializer web-page by choosing your dependency. Let me show how easy it is in the following gif.

Copying the web starter dependency

Now that you’ve copied the required dependency to power a web app, let’s go ahead and change our pom.xml so we could pull in the needed dependencies for bootstrapping a web-app.

Your pom file should look like my pom file in this commit.

Great! now we need to just add some magic and we are all set. For every web-app (Restful web app), you need the following logical entities for defining your restful web service;

  1. HTTP method (Defines the type of operation)
  2. Endpoint name (Defines a name for the operation)
  3. Parameters & Request payload (Defines user input for processing)
  4. Response (Defines how the response should look like)

These four things are what we are going to define in our DemoApplication.java.

Your DemoApplication.java should look like the one I have in this commit here.

That’s it! we are done with the code changes. Build your project and run it using the same command mvn spring-boot:run and now you should logs similar to the below screenshot.

Lets now open a browser and navigate to the following url

http://localhost:8080/sayHi?name=springboot

This should print the text Hi from springboot in your browser.

Congratulations your spring-boot app is ready and running with absolutely no configuration and no external server setup.

I know this is a lot of magic, but we’ve barely scratched the surface. There is a LOT of magic going on behind the scenes. I will attempt my take on it as part of a separate post in future. So long!

Standard
scala

Case classes in Scala!

At first, when I got introduced to case classes in Scala, I thought, why then hell does Scala have another way of creating classes? My initial google search taught me that case classes are classes specifically meant for holding data with minimum ceremony.

The java way of doing this would be to (Usual way of creating model classes);

  • Define a class with bunch of private fields.
  • Write constructor with all these fields as the parameters.
  • Define getters and setters for each of the fields.
  • Make the class extend the Serializable interface.

Scala does this all underneath the hood for you if you create a case class. That is right! case class is just Java classes on steroids. Well, since we are talking about Scala, how is it different from normal classes in Scala?

The fun thing here is case classes can also be considered as Scala classes on steroids, how you might ask. Case classes, would also do the following things besides just creating a class;

  • Creates the class along with a companion object.
  • A default toString method that includes all the fields and not the annoying @ and hex strings.
Normal class would give you the hex string while the case class object would give a more meaningful toString
  • A copy method that allows to create a new copy of the object with the exact same fields.
  • equals and hashCode methods would be overridden will be dependent on the fields instead of the meaningless object reference. This helps a lot with the objects being able to be added into List and Maps.

Finally, if your case class does not require any fields but just methods, we can go ahead and just create a case object directly.

Would just create an object with all the features specified above

Seems like this is not just a thing in Scala. Kotlin, a language heavily inspired by Scala also has this construct, but they call it data classes(https://kotlinlang.org/docs/reference/data-classes.html).

So, I hope its now a bit more clear as to why the hell is there another way to create classes and objects in Scala. Use them exactly by knowing where and when to use them.

Standard
implicit
scala

How to create extension methods in Scala using implicits

I guess my recent love for scala is quite evident lately. I began to fall in love with the conciseness and expressive nature of scala. But more than that, there is one thing that I am currently infatuated with; implicits – The magic keyword in scala.

Scala uses implicit's heavily to improve the conciseness of many design patterns that are native to functional programming and hence plays a key role in the core design of the language and many libraries in the community.

Let’s get started on how to put implicits into action and create an extension method to a class using implicit‘s.

So, what is this extension method in first place?

Extension methods are like extending a feature to a class that is otherwise in-extensible. Example of an extension method would be able to extend the functionality of Int class by creating a method that takes in a single digit as a number and returns the digit as a String. Something similar to the snippet shown below.

1.digitToWord() // This is an extension method on Int class

Clearly, this is not possible in statically typed language as the language would not allow you to add methods to the standard library and would fail to compile.

But scala has this magic language feature called implicit specially for performing a trick like this. Let us see how that is done.

implicit class ExtendedInt(val num: Int) {
  def digitToWord: String = {
    num match {
      case 1 => "One"
      case 2 => "Two"
      case 3 => "Three"
      case 4 => "Four"
      case 5 => "Five"
      case 6 => "Six"
      case 7 => "Seven"
      case 8 => "Eight"
      case 9 => "Nine"
      case 0 => "Zero"
      case _ => "Not a valid single digit"
    }
  }
}

Scala allows you to create an implicit class which has a method that returns a String. When we define this in the scope, scala compiler keeps track of this transformation from Int to String in the context and tries to use it whenever appropriate.

So, when you say,

1.digitToWord() // Implicit magic aka extension method call

Scala compiler will automatically check to see if its able to find one unique implicit that can take in an Int, construct an ExtendedInt and call digitToWord(). Since we already defined our implicit class Extendednt to take an Int to create an instance of ExtendedInt, compiler silently performs the following transformation for you.

new ExtendedInt(1).digitToWord() // After the implicit magic worn out

Cool isn’t it? Implicit is a complicated feature and would sound like something which makes the code very difficult to debug. Yes, that is true! Implicits are a very powerful feature indeed and often face a lot of criticisms. One has to use implicits with a word of caution and careful enough to stay responsible because, as Spiderman says,

“With great power comes great responsibility!”

Also yeah, Happy new year!

Standard
cassandra, libraries, scala

Access Cassandra using phantom – A type-safe scala library

This post is a quick tutorial on how to use Scala for interacting with Cassandra database. We will look into how to use phantom library for achieving this. phantom is a library that is written in Scala and acts as a wrapper on top of the cassandra-driver (Java driver for Cassandra).

The library phantom offers a very concise and typesafe way to write and design Cassandra interactions using Scala. In this post, I will be sharing my 2 cents for people getting started in using this library.

Prerequisites

Before getting started, I would like to make a few assumptions to keep this post concise and short as much as possible. My assumptions are that;

  1. You know what Cassandra is.
  2. You have Cassandra running locally or on a cluster for this tutorial.
  3. You have a piece of basic knowledge of what is Scala and sbt.

In this post, let’s write a simple database client for accessing User information. For simplicity sake, our User model would just have id, firstName, lastName and emailId as its fields. Since cassandra is all about designing your data-model based on your query use-case, we shall have two use-cases for accessing data and hence shall define two tables in cassandra.

The tables would have the following schema.

CREATE KEYSPACE user_keyspace WITH replication = {'class': 'SimpleStrategy', 'replication_factor': '1'};
CREATE TABLE user_keyspace.user_by_first_name (
firstname text PRIMARY KEY,
email text,
id uuid,
lastname text
);
CREATE TABLE user_keyspace.user_by_id (
id uuid PRIMARY KEY,
email text,
firstname text,
lastname text
);
view raw keyspace.cql hosted with ❤ by GitHub

Make sure your database has this schema configured before proceeding further.


Step 0: Add phantom library to the dependencies

Let us start by creating a simple sbt scala project and add the following dependency to build.sbt file to the libraryDependencies.

"com.outworkers" % "phantom-dsl_2.12" % "2.30.0"

Step 1: Define your model class

In cassandra, it is totally acceptable to denormalize the data and have multiple tables for the same model. phantom is designed to allow this. We define one case class as the data holder and several model classes that correspond to our different use cases. Let us go ahead and define the model and case classes for our User data-model.

// Base model used as DTO
case class User(id: UUID, firstName: String, lastName: String, email: String)
view raw User.scala hosted with ❤ by GitHub

Now, we define the tables that correspond to the tables in Cassandra. This allows phantom to construct the queries for us in a typesafe manner.

The following are the use cases for which we would need clients;

  1. To access the data using the user id. (user_by_id table)
  2. To access the data using the user’s first name. (user_by_first_name table)

We create appropriate models that reflect these tables in cassandra and define low-level queries using phantom-dsl to allow phantom to construct queries for us so we don’t have to write any cql statements ever in our application.

// Query based model
abstract class UserById extends Table[UserById, User] {
// Override table metadata
override def tableName: String = "user_by_id"
// Define the table schema
object id extends UUIDColumn with PartitionKey
object fName extends StringColumn {
override def name: String = "firstName"
}
object lName extends StringColumn {
override def name: String = "lastName"
}
object email extends StringColumn
// Define low level queries
def createUserById(uuid: UUID, firstName: String, lastName: String, emailId: String): Future[ResultSet] = {
insert
.value(_.id, uuid)
.value(_.fName, firstName)
.value(_.lName, lastName)
.value(_.email, emailId)
.future()
}
def getUserById(uuid: UUID): Future[Option[User]] = select
.all()
.where(_.id eqs uuid)
.one()
}
abstract class UserByFirstName extends Table[UserByFirstName, User] {
// Override table metadata
override def tableName: String = "user_by_first_name"
// Define the table schema
object fName extends StringColumn with PartitionKey {
override def name: String = "firstName"
}
object id extends UUIDColumn
object lName extends StringColumn {
override def name: String = "lastName"
}
object email extends StringColumn
// Define low level queries
def createUserByUserName(uuid: UUID, firstName: String, lastName: String, emailId: String): Future[ResultSet] = {
insert
.value(_.id, uuid)
.value(_.fName, firstName)
.value(_.lName, lastName)
.value(_.email, emailId)
.future()
}
def getUserByFirstName(firstName: String): Future[Option[User]] = select
.all()
.where(_.fName eqs firstName)
.one()
}
view raw UserModel.scala hosted with ❤ by GitHub

You can access the state of the project until this step in GitHub here.

Now that we have our models and low level queries defined, we need to design an effective way to manage our session and database instances.

Step 2: Encapsulate database instances in a Provider

Since we have interactions with multiple tables for a single model User, phantom provides a way to encapsulate these database instances at one place and manage it for us. This way, our implementations won’t be scattered around and will be effectively managed with the appropriate session object.

So, in this step, we define an encapsulation for all the database instances by extending phantom‘s Database class. This is where we create instances for the models we defined in the above step.

import com.outworkers.phantom.dsl._
// This class will encapsulate all the valid database instances
class UserDatabase(implicit cassandraConnection: CassandraConnection)
extends Database[UserDatabase](connector = cassandraConnection) {
object userByIdInstance extends UserById with Connector
object userByFirstName extends UserByFirstName with Connector
}
// This trait will act as a database instance provider.
trait UserDbProvider extends DatabaseProvider[UserDatabase]

Notice that we also defined a trait extending DatabaseProvider[UserDatabase] in the above snippet. We will in the next step discuss how this trait is useful.

You can access the state of the project until this step here.

Step 3: Orchestrate your queries using DatabaseProvider

Now, that you have your model and database instances in place, exposing these methods may not be a good design. What if you need some kind of data-validation/data-enrichment before accessing these methods. Well, to be very specific in our case, we would need to enter data into two tables when a User record is created. To serve such purposes, we need an extra layer of abstraction for accessing the queries we defined. This is the exact purpose of DatabaseProvider trait.

We define our database access layer (like a service) by extending the trait DatabaseProvider and orchestrate our low-level queries so that the application can access data with the right abstraction.

import com.outworkers.phantom.dsl._
import scala.concurrent.Future
trait UserDatabaseService extends UserDbProvider {
// Orchestrate your low level queries appropriately.
def createUser(uuid: UUID, firstName: String, lastName: String, email:String): Future[Option[UUID]] =
database.userByIdInstance.createUserById(uuid, firstName, lastName, email)
.flatMap(_ => {
database.userByFirstName.createUserByUserName(uuid, firstName, lastName, email)
.map(rs => if(rs.wasApplied) Some(uuid) else None)
})
def selectUserById(uuid: UUID): Future[Option[User]] = database.userByIdInstance.getUserById(uuid)
def selectUserByFirstName(firstName: String): Future[Option[User]] = database.userByFirstName.getUserByFirstName(firstName)
}

You can see that we were able to combine both the inserts (to user_by_id & user_by_first_name) in one method call. We could have definitely, done some sort of validation or data-transformation if we wanted to here.

You can access the state of the project until this step here.

Step 4: Putting everything together

We are all set to the database service we created so far. Lets see how this is done.

We start out by creating our CassandraConnection instance. This is how we can inject out cassandra configuration into phantom and let it manage the database session for us.

implicit val cassandraConnection: CassandraConnection = {
ContactPoint.local.keySpace("user_keyspace")
}

Here we are using cassandra installed locally, hence we used ContactPoint.local. Ideally in real-world we would have to use ContactPoints(hosts).

Then we create our database encapsulation instance and the service object.

object UserDatabase extends UserDatabase
object databaseService extends UserDatabaseService {
override def database: UserDatabase = UserDatabase
}
view raw Service.scala hosted with ❤ by GitHub

Now, it is as simple as just calling a bunch of methods to test out if our database interactions work.

val userPair = for{
uuid <- databaseService.createUser(UUID.nameUUIDFromBytes("Sumanth".getBytes), "Sumanth", "Kumar", "sumanth@indywiz.com")
userByFirstName <- databaseService.selectUserByFirstName("Sumanth")
userById <- databaseService.selectUserById(uuid.get)
} yield (userById, userByFirstName)
val res = userPair.map {
case (userById, userByFirstName) =>
logger.info(s"User by Id : ${userById.get}")
logger.info(s"User by first name: ${userByFirstName.get}")
}
view raw Call.scala hosted with ❤ by GitHub

You can find the final state of the project here.

We might have had a lot of constructs like Database, DatabaseProvider, etc, bundled with phantom-dsl. But in my opinion, this is something that makes it more than just yet another scala dsl-library. It is because of these design constructs, phantom implicitly promotes good design for people using it.

Hope you found my rambling useful.

Standard
asynchronous, scala

Testing futures in scala using scala test

Non-blocking external calls (web service) calls often would return a Future which will resolve to some value in the future. Testing such values in Java is pretty sad. Testing futures in java will usually involve performing a get()to resolve a future and then perform the assertions. I am pretty new to scala and was curious if I would have to do the same. Fortunately with Scala this is not the case. I will walk you thru my experience with an example and lets see how we do it in scala. In this post, we will be using scala-test library as our testing library and use FlatSpec type of testing.

Let’s start by defining our class to test. 

import scala.concurrent.{ExecutionContext, Future}
class NetworkCallExample {
implicit val ec: ExecutionContext = ExecutionContext.Implicits.global
private def getResponseFromServer(url: String): Future[Int] = {
Future {
Thread.sleep(5000)
10
}
}
// Dummy method to simulate a network call
def statusOfSomeOtherResponse(url: String): Future[Int] = {
println("Sending out request to some other url")
Future {
Thread.sleep(1000)
200
}
}
//Another dummy call
def lengthOfTheResponse(url: String): Future[Int] = {
println("Sending out request asynchronously to the server")
getResponseFromServer(url)
}
}

The above code is a simple scala class that will simulate a dummy network call by just sleeping for an arbitrary amount time.

lengthOfTheResponse(url: String): Future[Int] is a function that waits for 5 seconds and returns the number 10. 

Similarly, statusOfSomeOtherResponse(url: String): Future[Int]is another function that waits for 1 second and returns the number 200. Let’s see how we write tests for these function. 

import org.scalatest.FlatSpec
import org.scalatest.concurrent.ScalaFutures
class NetworkCallExampleTest extends FlatSpec with ScalaFutures {
it should "verify the future returns when complete" in {
val networkCallExample = new NetworkCallExample
//This will fail with a time out error
whenReady(networkCallExample.lengthOfTheResponse("testurl")) { res =>
assert(res == 10)
}
}
}

The above example looks great but will fail with the following error.

A timeout occurred waiting for a future to complete. Queried 10 times, sleeping 15 milliseconds between each query.

The default behavior of whenReady is to keep polling 10 times by waiting for 15 milliseconds in between to see if the future is resolved. If not, we get the above error. This clearly is not a consistent solution as we are depending on a finite time and polling to figure out the future result. Sure, we can configure the above whenReady method with a higher timeout and retry but there are better ways to test. Let’s see another approach.

class NetworkCallExampleTest extends AsyncFlatSpec {
it should "verify the future returns with for and yield" in {
val networkCallExample = new NetworkCallExample
for{
res <- networkCallExample.lengthOfTheResponse("testurl")
} yield {
assert(res == 10)
}
}
}

The above example will first execute the lengthOfTheResponse("testurl") resolve the future and yield the result Intinto resvariable. We then assert the result. But there is a gotcha we need to keep in mind. It is important that we use the AsyncFlatSpec instead of FlatSpec

We can also do more fluent version with multiple network calls. 

class NetworkCallExampleTest extends AsyncFlatSpec {
it should "verify the future returns with for and yield" in {
val networkCallExample = new NetworkCallExample
// More fluent version
for {
_ <- networkCallExample.lengthOfTheResponse("testurl")
status <- networkCallExample.statusOfSomeOtherResponse("some other url")
} yield {
assert(status == 200)
}
}
}

This way, we can kind of chain the futures in the order that we want to test and perform assertions accordingly. This will ensure that the futures resolve appropriately.

Let me know what you think of this and would certainly like to learn other approach to test futures.

Standard
cassandra

Load test Cassandra – The native way – Part 2: The How

In the previous post we talked briefly about why do we need to load test a service. In this post we’ll continue on where we left at the last post on how to load test cassandra. So, lets get started on how to use this amazingly powerful tool; cassandra-stress.


Things to keep in mind:

  • Load test should be simulating the real-time scenario. So, it is very important to have this setup as close to the one in production. It is highly recommended that we use a separate node/host in proximity to the cluster for load testing (Eg: Deploy the load test server in the same region if you are deployment is in AWS).
  • Do not use any node from the cluster itself for load testing. It is not unusual to think that, since cassandra-stress is a tool that comes bundled with the cassandra distribution and logically it makes sense to directly use the tool in one of the nodes. Because, cassandra-stress is a heavy-weight process and can consume a lot of JVM resources and can in-turn cloud your node’s performance.
  • We should also keep in mind that cassandra-stress tool is not actually a distributed program, so in order to test a cluster, we need to make sure that memory is not a bottleneck, so I would recommend to have a host with at-least 16Gigs of memory.

How to use cassandra-stress:

Step 1 : The configuration file

The configuration file is the way to let cassandra-stress tool to prepare key-space and table and prepare data for the load test. We need to configure a bunch of properties for defining the keyspace, table, data-distribution for the test and the queries to test. 

keyspaceKeyspace name
keyspace_definitionDefine keyspace
tableTable name
table_definitionDefine the table definition
columnspecColumn Distribution Specifications 
inserinsertBatch Ratio Distribution Specifications
queriesA list of queries you wish to run against the schema
# Keyspace Name
keyspace: keyspace_to_load_test
# The CQL for creating a keyspace (optional if it already exists)
keyspace_definition: |
CREATE KEYSPACE keyspace_to_load_test with replication = {'class': 'SimpleStrategy', 'replication_factor' : '3'}
# Table name
table: table_to_load_test
# The CQL for creating a table you wish to stress (optional if it already exists)
table_definition: |
CREATE TABLE table_to_load_test (
id uuid,
column1 text,
column2 int,
PRIMARY KEY((id), column1))
### Column Distribution Specifications ###
columnspec:
– name: id
population: GAUSSIAN(1..1000000, 500000, 15) # Normal distribution to mimic the production load
– name: column1
size: uniform(5..20) # Anywhere from 5 characters to 20 characters
cluster: fixed(5) #Assuming that we would be having 5 distinct carriers
– name: column2
size: uniform(100..500) # Anywhere from 5 characters to 20 characters
### Batch Ratio Distribution Specifications ###
insert:
partitions: fixed(1) # We are just going to be touching single partiton with an insert
select: fixed(1)/5 # We would want to update 1/5th of the rows in the partition at any given time
batchtype: UNLOGGED # No batched inserts
#
# A list of queries you wish to run against the schema
#
queries:
queryForUseCase:
cql: select * from table_to_load_test where id = ? and column1 = ?
fields: samerow

Now that we have this configuration file ready, we can use this to run our load test by using the cassandra-stress tool. Lets see how to run the tool now.


Step 2 : Command options

cassandra-stress tool comes bundled with your cassandra distribution download. You will be able to find the tool in apache-cassandra-<version>/tools/bin/.apache-cassandra-<version>/tools/bin/.  You can also learn the options available more deeply by checking out the help option in the tool. I will go thru an example and show you how to run the tool in this post. 

cassandra-stress user profile=stresstest.yaml duration=4h 'ops(insert=100, queryForUseCase =1)' cl=LOCAL_QUORUM -node <nodelist seperated by commas> -rate 'threads=450' throttle=30000/s -graph file="stress-result-4h-ratelimit-clients.html" title=Stress-test-4h -log file=result.log

Lets go over the options I used one by one to understand what they mean. This is by no means a comprehensive explanation. I would highly recommend giving the documentation a good read to know more about these options.

userSpecify the tool to say that cassandra-stress is used for running a load test on User specified schema.
profileSpecify where the configuration file (yaml file) exist.
durationDuration for which your load test should run
opsOperations defined in the yaml file to be included as part the load test. In our example it is insert and queryForUseCase defined in the yaml file.
clConsistency level for your operations
nodeNodes in the cluster
rate# of threads and peak ops/sec limit
graphGraphical report of the run. Specify the file name and title of the report
logLog file name

It is as simple as this. The tool will now run for the duration specified and output a detailed report on the run.

I hope you found this helpful and would certainly be delighted to answer any question regarding this.  

Standard
cassandra

Load test Cassandra – The native way – Part 1: The Why

Load testing is an imperative part of the software development process. The idea is to test out a feature/service in a prod-like environment with a realistic high load for an unusual time frame, just to gain confidence that the service would not bail out on us during critical times. Quite logical isn’t it? In this series, I’ll go thru my very brief experience load testing a schema in cassandra. So lets get started right way!

With micro-service architecture being a norm at almost every turn in software development, it is worth spending time, talking about how to load test a micro-service. Is it going to be different than testing a monolithic service? Since we say that we test out a near prod-like setup, does it mean that I have to spend a whole lot and setup the same number of nodes that prod-cluster has? But, what if I have some kind of auto-scaling setup? These were a few questions that I had when I had to load-test a micro-service. The answer is quite simple mathematics; extrapolation. We simulate the load to a node and then extrapolate the result. This however, may not be accurate as there may be a few things that might be left out of the equation like network bandwidth, disk I/O, etc. It is also essential to load test the load-balancer to get a clear picture.

But wait! The above method works fine as long as each service have just one responsibility. How about load testing a scenario where the architecture is supposed to perform only if its a part of a cluster?. What do we do, if these processes talk to each other and gossip among them? There are many big-data architectures like this and one such service is cassandra. Fortunately, there is a tool that comes bundled with cassandra for this very purpose; cassandra-stress.

cassandra-stress was initially developed as an internal tool created by developers of cassandra to load test the internals of cassandra. Later, a mode was added to this tool to enable cassandra users test their schema.

I wouldn’t definitely claim that cassandra-stress is the only way to achieve this. In fact, load testing cassandra was possible way before this tool was generally available to test cassandra cluster. My online research yielded the next most popular public choice was to use a JMeter plugin. I choose cassandra-stress because of the obvious fact that its a native tool that comes bundled with cassandra and has a pretty easy learning curve.

Let’s go over how to configure your own load test using the cassandra-stress tool in another post.

Standard
java, libraries

RxJava: Hot Observables

Hot observables are a type of observables where the observer would be able to multicast the message simultaneously to all its subscribers at once rather than creating one stream for each subscriber. Let me elaborate that a little bit. Usually, when you have an Observable, a subscriber subscribing to this observer will initiate the subscription and consume every message until the complete event is sent out. Every other subscriber will start the consumption from the start again.


List<Integer> integerList = IntStream.range(1, 11).boxed().collect(Collectors.toList());
Observable<Integer> integerObservable = Observable.fromIterable(integerList)
.map(integer -> integer * 2);
Disposable subscribe1 = integerObservable
.map(integer -> integer * 10)
.subscribe(integer -> System.out.println("From first subscriber: "+integer));
Disposable subscribe2 = integerObservable
.map(integer -> integer * 100)
.subscribe(integer -> System.out.println("From second subscriber: "+integer));

The output of the above code would be:

From first subscriber: 20
From first subscriber: 40
From first subscriber: 60
From first subscriber: 80
From first subscriber: 100
From first subscriber: 120
From first subscriber: 140
From first subscriber: 160
From first subscriber: 180
From first subscriber: 200
From second subscriber: 200
From second subscriber: 400
From second subscriber: 600
From second subscriber: 800
From second subscriber: 1000
From second subscriber: 1200
From second subscriber: 1400
From second subscriber: 1600
From second subscriber: 1800
From second subscriber: 2000

When you have more than one Observer, the default behavior is to create a separate stream for each one. We do not want this behavior always. Hot Observables are used to solve this. If there is a scenario where we want to share Observables, RxJava has a specific way to achieve this. Let’s see how that is done.


// Define your publisher
ConnectableObservable<Integer> integerObservable = Observable.fromIterable(integerList)
.map(integer -> integer * 2)
.publish();
// Define your subscribers
Disposable subscribe1 = integerObservable
.map(integer -> integer * 10)
.subscribe(integer -> System.out.println("From first subscriber: " + integer));
Disposable subscribe2 = integerObservable
.map(integer -> integer * 100)
.subscribe(integer -> System.out.println("From second subscriber: " + integer));
//Start publishing simultaneously
integerObservable.connect();

The above example is how you define a hot obsevervable. ConnectableObservable is a special type of Observable that would send events to all its subscribers simultaneously. All you need to do is to define your publisher by calling publish() method. Then define your subscribers normally as you would do with a normal Observable. Once you define your subscribers, you need to call the connect() method on the ConnectableObserver to start publishing the message simultaneously to all the subscribers.

Let’s see the output of the above code snippet:


From first subscriber: 20
From second subscriber: 200
From first subscriber: 40
From second subscriber: 400
From first subscriber: 60
From second subscriber: 600
From first subscriber: 80
From second subscriber: 800
From first subscriber: 100
From second subscriber: 1000
From first subscriber: 120
From second subscriber: 1200
From first subscriber: 140
From second subscriber: 1400
From first subscriber: 160
From second subscriber: 1600
From first subscriber: 180
From second subscriber: 1800
From first subscriber: 200
From second subscriber: 2000

ConnectableObservable will force emissions from the source to become hot, pushing a single stream of emissions to all Observers at the same time rather than giving a separate stream to each Observer.


Standard
cassandra

Cassandra – A shift from SQL

We have had lot of shifts in the paradigm in how we think about persisting data and retrieving them as efficiently as possible. For the longest time, we have had SQL as our goto solution for persisting data. SQL definitely is an awesome solution and that is the reason why it had survived the test of time for so long (Fun Fact: The first commercial RDBMS was Oracle which got released in 1979 [1]) and is definitely not in any space to go down in the near future.

 In my opinion, SQL gave us all a near perfect, generic solution for persisting data. SQL gives a lot of importance to things such as data-integrity, atomicity, normalization of data so the data is always in a consistent state whilst maintaining the query performance. Hence, it has got its own way to sort out things among itself with joins, foreign-keys, etc. Of-course, life is not always too fair. This magic that SQL does comes with a price to scale. SQL datastores are often not horizontally scalable and would require manual and application logic to shard the data to decrease the load. One other big challenge with SQL is having a single point of failure. The reason for this is again attributing to its inability to scale horizontally.

We were taught to think database design in this way, and hence that is what we do the best. But majority of the applications do not care about the size of the data or how its stored. On the other hand we don’t actually mind if the data is replicated in multiple locations. In fact, memory has become so cheap now, that we would love to have data duplication where ever possible.

With the intrusion of big data on almost every domain, it does not always make sense to hold on to SQL way of doing things. I’m in no way suggesting that SQL does not have future and everyone who are depending on big data need to resort to NoSQL way of doing things. The idea is to think by prioritizing the feature-set you would need for your datastore to have and, be open to pick and prioritize what you would need. Keep in mind that using both NoSQL and SQL hand-in-hand is not considered a bad practice at all. Just make sure that you are not over engineering your use case.

There are multiple options in the market right now. But, we are going to talk about one such datastore; Cassandra. Why Cassandra? Because, that is the one I have the most insight to talk about. Cassandra, has now reached a very mature state with many big-shots using it as their datastore. Few of them worth mentioning are Netflix, Apple, SoundCloud, etc. So, what is this Cassandra all about? Cassandra is a very powerful, battle-tested data-store that provides high availability with high read and write throughput.

I did talk about letting go few features that relational database provide could give you benefits such as ability to scale horizontally, increase the availability, etc. So, what is the compromise that we have to make if we choose Cassandra? It is the data model.

Data model is the best way you can fine tune your cassandra cluster. Relational databases often deal with creating a logical entity called tables, and relationships among the tables using Foreign-keys. Since Cassandra does not have any kind of joins or relation-ships, the data has to be stored in a denormalized fashion. This is actually not a bad thing in casssandra. But the catch is that, we need to know the query access patterns before designing the model. But if done properly, the performance that we get out of Cassandra is phenomenal. Here is a link that talks about the benchmarking on cassandra cluster at Netflix.

I would like to get this going as a series, so I will stop talking about cassandra now and we’ll start off with how to model your data in cassandra in a different post.


Standard
maven reactor
build-tools, java

Maven reactor: A smart way to a modular project structure

Usually, I would just avoid any thing that involves XML processing or XML configuration in it. So, I wasn’t a big fan of maven either when I started using it. Have I had any good alternate to build projects, I would have undoubtedly inclined towards it. Now, I do understand that gradle is still out there giving a very tough competition to maven. But, I feel it still has lot of distance to cover up; Maven just has got an awesome head start and I don’t think it could be replaced by gradle, even though with a lot new framework’s supporting it (Android, Spring, etc.). I was quite amazed to know what capabilities that maven could do to ease up the life of a programmer.

We can go on and on if I start talking about maven. But I would like to share one interesting feature I like about maven; The Reactor plugin.

It is often recommended to have your projects small and concise for obvious reasons. But usually, we find one huge project or a bunch of small standalone projects that depend on each other. Even if we divide a huge project into multiple small and cohesive projects/libraries/modules, we still have an overhead to manually make sure that the projects are built in the right order to make sure the right dependency is picked up. Many projects end up growing enormously due to this extra overhead on the developer when building the project.

Maven, does have a smart way for us to manage the modules for us without us having to make sure if the modules in the projects are built in the right order. Let’s see how that is done.

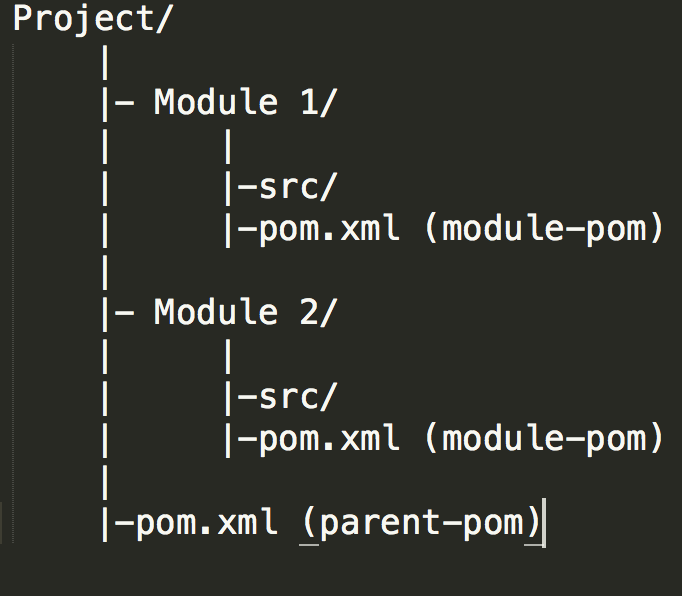
So, how reactor project works is that, you would have to setup a top-level pom that manages all your modules. This is usually called the parent-pom. All the modules that are part of this project will just be another simple maven project that will inherit this parent-pom. Along with this you will also, need to specify to the parent-pom on what are its children/modules. This will ensure maven does all the magic for you while its building your project.

Structure of a Maven reactor project

Structure of a Maven reactor project

That is all you need to do. Let’s now take a look at how to define your parent-pom.

Parent-pom:


<?xml version="1.0" encoding="UTF-8"?>
<project xmlns="http://maven.apache.org/POM/4.0.0&quot;
xmlns:xsi="http://www.w3.org/2001/XMLSchema-instance&quot;
xsi:schemaLocation="http://maven.apache.org/POM/4.0.0 http://maven.apache.org/xsd/maven-4.0.0.xsd"&gt;
<modelVersion>4.0.0</modelVersion>
<groupId>com.indywiz.springorama.reactor</groupId>
<artifactId>maven-reactor-parent</artifactId>
<packaging>pom</packaging>
<version>1.0-SNAPSHOT</version>
<modules>
<module>maven-reactor-app</module>
<module>maven-reactor-util</module>
</modules>
</project>

view raw

parent-pom.xml

hosted with ❤ by GitHub

If you check out what is different when you compare the pom with a traditional pom file is the following.

  • Packaging is set to pom instead of jar/war. This is because, your parent-pom is just a maven entity to manage your module, it is not a project that produces any artifact for you.
  • The modules tag. This tag is responsible for defining what are all the projects that the reactor has to manage.

Keep in mind that the order you define your modules does not matter, we will go thru that part in the end.

Now lets look at the module-pom.

Module-pom:


<?xml version="1.0" encoding="UTF-8"?>
<project xmlns="http://maven.apache.org/POM/4.0.0&quot;
xmlns:xsi="http://www.w3.org/2001/XMLSchema-instance&quot;
xsi:schemaLocation="http://maven.apache.org/POM/4.0.0 http://maven.apache.org/xsd/maven-4.0.0.xsd"&gt;
<parent>
<artifactId>maven-reactor-parent</artifactId>
<groupId>com.indywiz.springorama.reactor</groupId>
<version>1.0-SNAPSHOT</version>
</parent>
<modelVersion>4.0.0</modelVersion>
<artifactId>maven-reactor-util</artifactId>
<name>maven-reactor-util</name>
<properties>
<project.build.sourceEncoding>UTF-8</project.build.sourceEncoding>
<maven.compiler.source>1.8</maven.compiler.source>
<maven.compiler.target>1.8</maven.compiler.target>
</properties>
<dependencies>
<dependency>
<groupId>org.apache.commons</groupId>
<artifactId>commons-lang3</artifactId>
<version>3.7</version>
</dependency>
<dependency>
<groupId>junit</groupId>
<artifactId>junit</artifactId>
<version>4.11</version>
<scope>test</scope>
</dependency>
</dependencies>
</project>

view raw

module1-pom.xml

hosted with ❤ by GitHub

So, in this example, the first module is just a util library where I am using commons-lang3 library from apache. One other thing you will have to note is that we do not need to specify the groupId and the version in this pom. They are inherited from your parent-pom.

Now, I would like to use this module as a dependency on my module 2. The second module’s pom is similar to the first module. I just add the first module as the dependency to it.


<dependency>
<groupId>com.indywiz.springorama.reactor</groupId>
<artifactId>maven-reactor-util</artifactId>
<version>1.0-SNAPSHOT</version>
</dependency>

Now, all you have to do is to build the parent pom and see the magic happen.

Maven reactor build result

Maven reactor build result

So, what just happened was that, when we built the parent pom, reactor build part kicked in and maven started to check what are all the modules that come under this project, build the dependency graph and dynamically figured out that module2 (i.e the util project) depends on module 1 (the app module) and build util module before it started building the app module.

I deliberately, reversed the order in which I defined the modules in the parent pom. If you check the parent-pom’s modules tag, we defined app module before the util module. I did that on purpose to show that the order in which we define does not matter. Maven reactor will figure out the right order to build these project irrespective to the order in which they are defined in the parent pom.


<modules>
<module>maven-reactor-app</module>
<module>maven-reactor-util</module>
</modules>

I hope you guys also enjoyed this post. I’d be happy to hear your feedback. In case you can check out the complete example in github here.

Standard