
The Only Thing That Is Constant Is Change.
― Heraclitus
With Oracle opting to release for every six months (more info on this here), it’s obvious that we would end up having multiple java versions on our machine. The obvious next challenge would be to manage these installations and not mess up the java installation on our local machine.
TLDR; I have split this post into three parts. Feel free to jump on to any part as per your needs.
Part 1: How to install homebrew and homebrew-cask
Part 2: How to install java using homebrew.
Part 3: How to manage multiple java installations using jenv.
Part 1:
Install Homebrew and Homebrew-cask:
There is an awesome way for Mac users to install and manage their Java installations in a graceful way. Before getting to how to manage multiple versions of Java, let’s get to how to install java on a Mac OS X.
IMHO, if you are going to develop java apps or, to that matter of fact any programming in your Mac, I feel its almost mandatory to have homebrew tool installed on your machine.
If you do not have the tool installed yet, please do visit homebrew’s webpage to know how to install homebrew on your local machine.
Homebrew is what yum is for linux. Its a package manager for Mac OS.
Verify that you have correctly installed homebrew by running the following command.

Also, while you do this, do install the homebrew-cask by running the following command. (Visit this place to see any other interesting way to install cask).
~> brew tap phinze/homebrew-cask
~> brew install brew-cask
Now you have all the power to install awesome tools from homebrew.
Part 2:
Install Java thru Homebrew
Now all you have to do is to run the following command in your terminal.
Step 1: Verify if you have a java version:
~> brew cask info java8
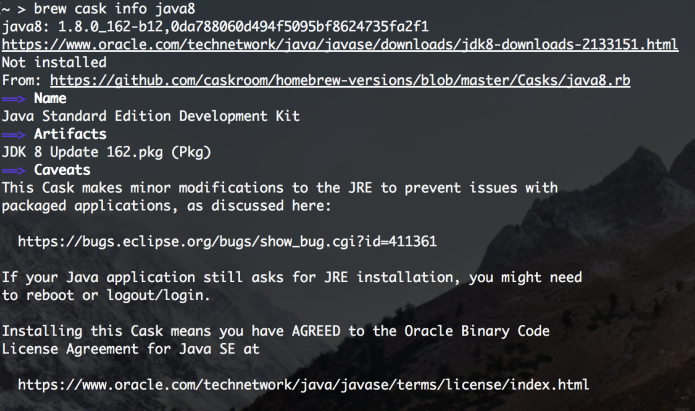
Observe that the output shows that java8: 1.8.0_162-b12 is not installed.
Step 2: Install java:
~> brew cask install java8
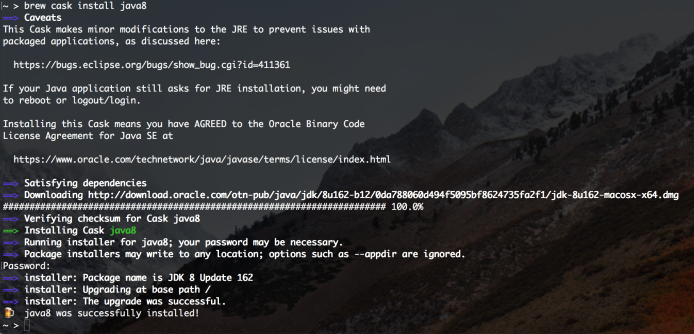
You have now successfully installed java on your Mac.
Part 3:
Install jenv to manage multiple version of java on Mac OS X:
Alright, now that you have java, let’s say within six months from now you get a new release for java. You do not want to upgrade your projects, but still, try out new and cool language features.
Managing multiple java versions might be a nightmare and requires some effort. Luckily, to our rescue is an awesome tool called jenv. Let’s look at how to manage multiple java versions in an awesome way.
jenv is a utility tool that manages multiple versions of java and gives you control to switch java versions with ease.
If you have made it this far, it is assumed that you have installedhomebrew on your machine, so lets get started right away to install jenv.
All you need to install jenv is to run the following command.
~> brew install jenv
~> echo 'eval "$(jenv init -)"' >> ~/.bash_profile
If you see the following result after your,brew install jenv command, then you have successfully installed jenv on your machine.

Run the following command to add java versions for jenv to manage for you.
~> jenv add /Library/Java/JavaVirtualMachines/jdk1.8.0_162.jdk/Contents/Home/
That’s it, your java version can be managed by jenv now.
PS: You might run into problems with the following error when trying to run the above command.
ln: /Users/your_username/.jenv/versions/oracle64-1.8.0.162: No such file or directory
If you encounter this result when adding your java version, all you need to do is to create a directory .jenv and versions in your home directory and run the add command again.
Once the jenv add command succeeds, you should see a message like this

Boom! done.
If you have multiple java installations on your machine, you would have to add all the java installations to jenv.
jenv provides you different commands to switch java versions based on your needs.
To list all the java installs managed by jenv run:
~> jenv versions
* system (set by /Users/vranganathan/.jenv/version)
1.8
1.8.0.162
9.0
9.0.4
oracle64-1.8.0.162
oracle64-9.0.4
To configure a version:
//Configure globally on your machine
~> jenv global 1.8

//Configure locally per directory
~> jenv local 1.8

//Configure per shell
~> jenv shell 1.8
There are lot more features that jenv offers. You can go thru their documentation briefed in their github page.
