cassandra, libraries, scala

Access Cassandra using phantom – A type-safe scala library

This post is a quick tutorial on how to use Scala for interacting with Cassandra database. We will look into how to use phantom library for achieving this. phantom is a library that is written in Scala and acts as a wrapper on top of the cassandra-driver (Java driver for Cassandra).

The library phantom offers a very concise and typesafe way to write and design Cassandra interactions using Scala. In this post, I will be sharing my 2 cents for people getting started in using this library.

Prerequisites

Before getting started, I would like to make a few assumptions to keep this post concise and short as much as possible. My assumptions are that;

  1. You know what Cassandra is.
  2. You have Cassandra running locally or on a cluster for this tutorial.
  3. You have a piece of basic knowledge of what is Scala and sbt.

In this post, let’s write a simple database client for accessing User information. For simplicity sake, our User model would just have id, firstName, lastName and emailId as its fields. Since cassandra is all about designing your data-model based on your query use-case, we shall have two use-cases for accessing data and hence shall define two tables in cassandra.

The tables would have the following schema.

CREATE KEYSPACE user_keyspace WITH replication = {'class': 'SimpleStrategy', 'replication_factor': '1'};
CREATE TABLE user_keyspace.user_by_first_name (
firstname text PRIMARY KEY,
email text,
id uuid,
lastname text
);
CREATE TABLE user_keyspace.user_by_id (
id uuid PRIMARY KEY,
email text,
firstname text,
lastname text
);
view raw keyspace.cql hosted with ❤ by GitHub

Make sure your database has this schema configured before proceeding further.


Step 0: Add phantom library to the dependencies

Let us start by creating a simple sbt scala project and add the following dependency to build.sbt file to the libraryDependencies.

"com.outworkers" % "phantom-dsl_2.12" % "2.30.0"

Step 1: Define your model class

In cassandra, it is totally acceptable to denormalize the data and have multiple tables for the same model. phantom is designed to allow this. We define one case class as the data holder and several model classes that correspond to our different use cases. Let us go ahead and define the model and case classes for our User data-model.

// Base model used as DTO
case class User(id: UUID, firstName: String, lastName: String, email: String)
view raw User.scala hosted with ❤ by GitHub

Now, we define the tables that correspond to the tables in Cassandra. This allows phantom to construct the queries for us in a typesafe manner.

The following are the use cases for which we would need clients;

  1. To access the data using the user id. (user_by_id table)
  2. To access the data using the user’s first name. (user_by_first_name table)

We create appropriate models that reflect these tables in cassandra and define low-level queries using phantom-dsl to allow phantom to construct queries for us so we don’t have to write any cql statements ever in our application.

// Query based model
abstract class UserById extends Table[UserById, User] {
// Override table metadata
override def tableName: String = "user_by_id"
// Define the table schema
object id extends UUIDColumn with PartitionKey
object fName extends StringColumn {
override def name: String = "firstName"
}
object lName extends StringColumn {
override def name: String = "lastName"
}
object email extends StringColumn
// Define low level queries
def createUserById(uuid: UUID, firstName: String, lastName: String, emailId: String): Future[ResultSet] = {
insert
.value(_.id, uuid)
.value(_.fName, firstName)
.value(_.lName, lastName)
.value(_.email, emailId)
.future()
}
def getUserById(uuid: UUID): Future[Option[User]] = select
.all()
.where(_.id eqs uuid)
.one()
}
abstract class UserByFirstName extends Table[UserByFirstName, User] {
// Override table metadata
override def tableName: String = "user_by_first_name"
// Define the table schema
object fName extends StringColumn with PartitionKey {
override def name: String = "firstName"
}
object id extends UUIDColumn
object lName extends StringColumn {
override def name: String = "lastName"
}
object email extends StringColumn
// Define low level queries
def createUserByUserName(uuid: UUID, firstName: String, lastName: String, emailId: String): Future[ResultSet] = {
insert
.value(_.id, uuid)
.value(_.fName, firstName)
.value(_.lName, lastName)
.value(_.email, emailId)
.future()
}
def getUserByFirstName(firstName: String): Future[Option[User]] = select
.all()
.where(_.fName eqs firstName)
.one()
}
view raw UserModel.scala hosted with ❤ by GitHub

You can access the state of the project until this step in GitHub here.

Now that we have our models and low level queries defined, we need to design an effective way to manage our session and database instances.

Step 2: Encapsulate database instances in a Provider

Since we have interactions with multiple tables for a single model User, phantom provides a way to encapsulate these database instances at one place and manage it for us. This way, our implementations won’t be scattered around and will be effectively managed with the appropriate session object.

So, in this step, we define an encapsulation for all the database instances by extending phantom‘s Database class. This is where we create instances for the models we defined in the above step.

import com.outworkers.phantom.dsl._
// This class will encapsulate all the valid database instances
class UserDatabase(implicit cassandraConnection: CassandraConnection)
extends Database[UserDatabase](connector = cassandraConnection) {
object userByIdInstance extends UserById with Connector
object userByFirstName extends UserByFirstName with Connector
}
// This trait will act as a database instance provider.
trait UserDbProvider extends DatabaseProvider[UserDatabase]

Notice that we also defined a trait extending DatabaseProvider[UserDatabase] in the above snippet. We will in the next step discuss how this trait is useful.

You can access the state of the project until this step here.

Step 3: Orchestrate your queries using DatabaseProvider

Now, that you have your model and database instances in place, exposing these methods may not be a good design. What if you need some kind of data-validation/data-enrichment before accessing these methods. Well, to be very specific in our case, we would need to enter data into two tables when a User record is created. To serve such purposes, we need an extra layer of abstraction for accessing the queries we defined. This is the exact purpose of DatabaseProvider trait.

We define our database access layer (like a service) by extending the trait DatabaseProvider and orchestrate our low-level queries so that the application can access data with the right abstraction.

import com.outworkers.phantom.dsl._
import scala.concurrent.Future
trait UserDatabaseService extends UserDbProvider {
// Orchestrate your low level queries appropriately.
def createUser(uuid: UUID, firstName: String, lastName: String, email:String): Future[Option[UUID]] =
database.userByIdInstance.createUserById(uuid, firstName, lastName, email)
.flatMap(_ => {
database.userByFirstName.createUserByUserName(uuid, firstName, lastName, email)
.map(rs => if(rs.wasApplied) Some(uuid) else None)
})
def selectUserById(uuid: UUID): Future[Option[User]] = database.userByIdInstance.getUserById(uuid)
def selectUserByFirstName(firstName: String): Future[Option[User]] = database.userByFirstName.getUserByFirstName(firstName)
}

You can see that we were able to combine both the inserts (to user_by_id & user_by_first_name) in one method call. We could have definitely, done some sort of validation or data-transformation if we wanted to here.

You can access the state of the project until this step here.

Step 4: Putting everything together

We are all set to the database service we created so far. Lets see how this is done.

We start out by creating our CassandraConnection instance. This is how we can inject out cassandra configuration into phantom and let it manage the database session for us.

implicit val cassandraConnection: CassandraConnection = {
ContactPoint.local.keySpace("user_keyspace")
}

Here we are using cassandra installed locally, hence we used ContactPoint.local. Ideally in real-world we would have to use ContactPoints(hosts).

Then we create our database encapsulation instance and the service object.

object UserDatabase extends UserDatabase
object databaseService extends UserDatabaseService {
override def database: UserDatabase = UserDatabase
}
view raw Service.scala hosted with ❤ by GitHub

Now, it is as simple as just calling a bunch of methods to test out if our database interactions work.

val userPair = for{
uuid <- databaseService.createUser(UUID.nameUUIDFromBytes("Sumanth".getBytes), "Sumanth", "Kumar", "sumanth@indywiz.com")
userByFirstName <- databaseService.selectUserByFirstName("Sumanth")
userById <- databaseService.selectUserById(uuid.get)
} yield (userById, userByFirstName)
val res = userPair.map {
case (userById, userByFirstName) =>
logger.info(s"User by Id : ${userById.get}")
logger.info(s"User by first name: ${userByFirstName.get}")
}
view raw Call.scala hosted with ❤ by GitHub

You can find the final state of the project here.

We might have had a lot of constructs like Database, DatabaseProvider, etc, bundled with phantom-dsl. But in my opinion, this is something that makes it more than just yet another scala dsl-library. It is because of these design constructs, phantom implicitly promotes good design for people using it.

Hope you found my rambling useful.

Standard
java, libraries

RxJava: Hot Observables

Hot observables are a type of observables where the observer would be able to multicast the message simultaneously to all its subscribers at once rather than creating one stream for each subscriber. Let me elaborate that a little bit. Usually, when you have an Observable, a subscriber subscribing to this observer will initiate the subscription and consume every message until the complete event is sent out. Every other subscriber will start the consumption from the start again.


List<Integer> integerList = IntStream.range(1, 11).boxed().collect(Collectors.toList());
Observable<Integer> integerObservable = Observable.fromIterable(integerList)
.map(integer -> integer * 2);
Disposable subscribe1 = integerObservable
.map(integer -> integer * 10)
.subscribe(integer -> System.out.println("From first subscriber: "+integer));
Disposable subscribe2 = integerObservable
.map(integer -> integer * 100)
.subscribe(integer -> System.out.println("From second subscriber: "+integer));

The output of the above code would be:

From first subscriber: 20
From first subscriber: 40
From first subscriber: 60
From first subscriber: 80
From first subscriber: 100
From first subscriber: 120
From first subscriber: 140
From first subscriber: 160
From first subscriber: 180
From first subscriber: 200
From second subscriber: 200
From second subscriber: 400
From second subscriber: 600
From second subscriber: 800
From second subscriber: 1000
From second subscriber: 1200
From second subscriber: 1400
From second subscriber: 1600
From second subscriber: 1800
From second subscriber: 2000

When you have more than one Observer, the default behavior is to create a separate stream for each one. We do not want this behavior always. Hot Observables are used to solve this. If there is a scenario where we want to share Observables, RxJava has a specific way to achieve this. Let’s see how that is done.


// Define your publisher
ConnectableObservable<Integer> integerObservable = Observable.fromIterable(integerList)
.map(integer -> integer * 2)
.publish();
// Define your subscribers
Disposable subscribe1 = integerObservable
.map(integer -> integer * 10)
.subscribe(integer -> System.out.println("From first subscriber: " + integer));
Disposable subscribe2 = integerObservable
.map(integer -> integer * 100)
.subscribe(integer -> System.out.println("From second subscriber: " + integer));
//Start publishing simultaneously
integerObservable.connect();

The above example is how you define a hot obsevervable. ConnectableObservable is a special type of Observable that would send events to all its subscribers simultaneously. All you need to do is to define your publisher by calling publish() method. Then define your subscribers normally as you would do with a normal Observable. Once you define your subscribers, you need to call the connect() method on the ConnectableObserver to start publishing the message simultaneously to all the subscribers.

Let’s see the output of the above code snippet:


From first subscriber: 20
From second subscriber: 200
From first subscriber: 40
From second subscriber: 400
From first subscriber: 60
From second subscriber: 600
From first subscriber: 80
From second subscriber: 800
From first subscriber: 100
From second subscriber: 1000
From first subscriber: 120
From second subscriber: 1200
From first subscriber: 140
From second subscriber: 1400
From first subscriber: 160
From second subscriber: 1600
From first subscriber: 180
From second subscriber: 1800
From first subscriber: 200
From second subscriber: 2000

ConnectableObservable will force emissions from the source to become hot, pushing a single stream of emissions to all Observers at the same time rather than giving a separate stream to each Observer.


Standard
RxJava
asynchronous, java, libraries

RxJava: A much needed programmer friendly library

Recently, I had to do a lot of concurrent-programming. To be honest, it has not been a pleasure ride. Writing java programs with concurrency in mind is not a straightforward task. Primary reason being, not many utilities come bundled with the language to ease up the concurrent task in hand. A few of them to name are Future, CompletableFuture, Executors. In my opinion, the best help java provides to us is thru CompletableFutures. We have talked about CompletableFutures in a post already.

Nevertheless, I feel that CompletableFutures solves a very specific problem, i.e. to chain asynchronous tasks together in a very fluid way. Ideally what we would want in a concurrent program is the ability to not worry about number of threads, a pool to manage threads whilst having the ability to compose and chain tasks together.

RxJava is one such library that solves scenarios like this with ease. Though RxJava is not designed to solve problems involving concurrency, the underlying concepts that RxJava is based on, implicitly gives us an awesome way to develop concurrent applications.

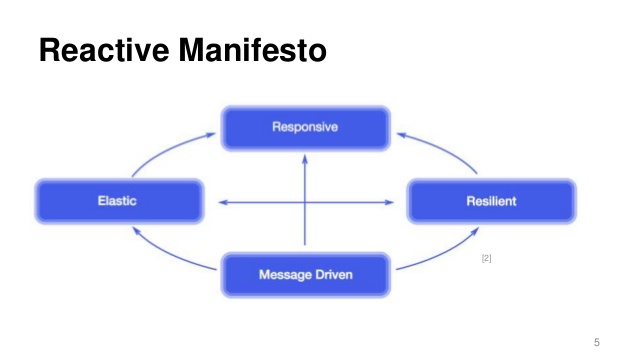
RxJava is based on the Reactive Manifesto. Reactive manifesto primarily deals with four main traits as shown in the figure below.

Reactive manifesto traits

Reactive manifesto traits

Let’s not get deep into each one of these traits. But the reason RxJava provides easy concurrent programming inherently is due its message-driven trait.

According to the reactive manifesto:

Reactive Systems rely on asynchronous message-passing to establish a boundary between components that ensures loose coupling, isolation and location transparency. This boundary also provides the means to delegate failures as messages. Employing explicit message-passing enables load management, elasticity, and flow control by shaping and monitoring the message queues in the system and applying back-pressure when necessary.

RxJava leverages this message-driven trait in all its components. Hence, we could design a seamless message publish-subscribe kind of application that inherently gives you ability to change your implementation to an asynchronous very easily. We just have to specify if the task on hand is CPU intensive work or I/O bound. RxJava internally takes care of managing the concurrency for you.

Let’s see an example on what I meant.

Observable.fromArray(1, 2, 3, 4, 5)
    .observeOn(Schedulers.computation())
    .map(integer -> {
      System.out.println("Executing cpu intensive task on thread : "+Thread.currentThread().getName());
      return cpuIntensiveTask(integer);
    })
    .observeOn(Schedulers.io())
    .map(integer -> {
      System.out.println("Executing i/o bound task on thread : "+Thread.currentThread().getName());
      return ioBoundTask(integer);
    })
    .blockingSubscribe(integer -> System.out.println("Result = "+integer));

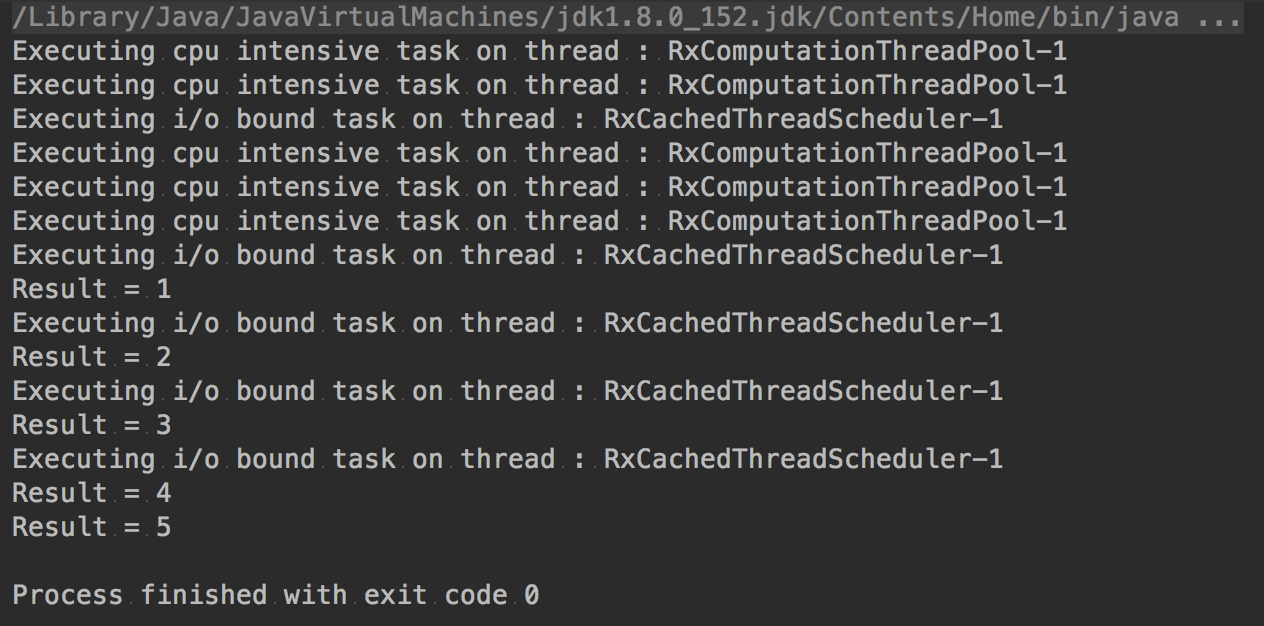
If you see the above code, all we had to specify was to tell if it is going to be a task that is cpu-intensive or i/o-intensive. This will output the following:

Screen Shot 2018-05-20 at 12.49.08 AM

The above code is very similar to a Java stream but, yet it is very different from what streams are. RxJava provides the fluidity that java streams provide along with the power of composing multiple asynchronous tasks similar to what we know about CompletableFutures.

There is lot more to RxJava than what we have talked about in this post. Lets get more hands on in future posts. The intent of this post was to share my perspective on RxJava and why it is one of the best programmer-friendly library out there. I would encourage you to definitely try out RxJava and let me know what you feel about this awesome library.

Standard
java, libraries

Lombok – A must have library to spice up your Java

Java, unfortunately, does have a lot of unwanted verbosity when it comes to creating classes. Whilst there are new languages on jvm competing with each other by having to write very less amount of boilerplate code, java still is not even close to these competitors.

While we sit and complain about the language’s inability to incorporate reduction of unwanted ceremony of code, ProjectLombok, has given us a work around to make our lives a little bit easier.

Alright, I am a Java programmer about to write a simple model class for my CRUD operations. I will have to go thru the following steps to create the model.

  1. Create the model-class.
  2. Define the attributes for the model with right scope. (Since its good practice to encapsulate attributes properly, I will have to set the access specifier to private. Personally I’m not a big fan of this).
  3. Create default constructor and parameterized-constructors based on my needs.
  4. Optionally, I also have to override toString(), equals() and hashCode() if needed.
  5. If I am done with the above stuff, I might think of have a nice builder pattern if needed, so that I can have a fluid way to populate the attributes.

This has to be repeated and could sometimes be a very painful thing, if we have to do it for many models and, things for sure will get annoying if the model class has to change. Clearly, we don’t have to do such things in modern languages like scala or groovy or kotlin. These languages give you getters, setters, etc., for free. It would be awesome if java would also come up with something like this to avoid unnecessary boilerplate code when instantiating classes. Well, Lombok exactly solves this thing for us. It silently generates all the boiler plate code by integrating with the build tool and also the IDE for you to focus just on specifying what you need and the business logic.

If you look at the above steps we followed to create a model class, except creating the class and the attributes (which we have to anyway in any language) everything else, starting from specifying access specifier, creating getters and setters for the same, having to override bunch of obvious methods could be avoided and Lombok provides an awesome way to achieve this thru annotations.

Below is a model where I used Lombok annotations in the Spring-Integration post.


package com.indywiz.springorama.springintegration.model;
import javax.persistence.Entity;
import javax.persistence.Id;
import lombok.AllArgsConstructor;
import lombok.Builder;
import lombok.Data;
import lombok.NoArgsConstructor;
import lombok.ToString;
@Data
@Entity
@Builder
@ToString
@NoArgsConstructor
@AllArgsConstructor
public class Person {
@Id
private Long personId;
private String personName;
private String personPhoneNumber;
}

view raw

Person.java

hosted with ❤ by GitHub

This is a very simple model where I have just three fields, couple of JPA annotations and a bunch of Lombok annotations. The interesting thing to see is what Lombok generated for me when compiling the class.


package com.indywiz.springorama.springintegration.model;
import javax.persistence.Entity;
import javax.persistence.Id;
@Entity
public class Person {
@Id
private Long personId;
private String personName;
private String personPhoneNumber;
public static Person.PersonBuilder builder() {
return new Person.PersonBuilder();
}
public Long getPersonId() {
return this.personId;
}
public String getPersonName() {
return this.personName;
}
public String getPersonPhoneNumber() {
return this.personPhoneNumber;
}
public void setPersonId(Long personId) {
this.personId = personId;
}
public void setPersonName(String personName) {
this.personName = personName;
}
public void setPersonPhoneNumber(String personPhoneNumber) {
this.personPhoneNumber = personPhoneNumber;
}
public boolean equals(Object o) {
if (o == this) {
return true;
} else if (!(o instanceof Person)) {
return false;
} else {
Person other = (Person)o;
if (!other.canEqual(this)) {
return false;
} else {
label47: {
Object this$personId = this.getPersonId();
Object other$personId = other.getPersonId();
if (this$personId == null) {
if (other$personId == null) {
break label47;
}
} else if (this$personId.equals(other$personId)) {
break label47;
}
return false;
}
Object this$personName = this.getPersonName();
Object other$personName = other.getPersonName();
if (this$personName == null) {
if (other$personName != null) {
return false;
}
} else if (!this$personName.equals(other$personName)) {
return false;
}
Object this$personPhoneNumber = this.getPersonPhoneNumber();
Object other$personPhoneNumber = other.getPersonPhoneNumber();
if (this$personPhoneNumber == null) {
if (other$personPhoneNumber != null) {
return false;
}
} else if (!this$personPhoneNumber.equals(other$personPhoneNumber)) {
return false;
}
return true;
}
}
}
protected boolean canEqual(Object other) {
return other instanceof Person;
}
public int hashCode() {
int PRIME = true;
int result = 1;
Object $personId = this.getPersonId();
int result = result * 59 + ($personId == null ? 43 : $personId.hashCode());
Object $personName = this.getPersonName();
result = result * 59 + ($personName == null ? 43 : $personName.hashCode());
Object $personPhoneNumber = this.getPersonPhoneNumber();
result = result * 59 + ($personPhoneNumber == null ? 43 : $personPhoneNumber.hashCode());
return result;
}
public String toString() {
return "Person(personId=" + this.getPersonId() + ", personName=" + this.getPersonName() + ", personPhoneNumber=" + this.getPersonPhoneNumber() + ")";
}
public Person() {
}
public Person(Long personId, String personName, String personPhoneNumber) {
this.personId = personId;
this.personName = personName;
this.personPhoneNumber = personPhoneNumber;
}
public static class PersonBuilder {
private Long personId;
private String personName;
private String personPhoneNumber;
PersonBuilder() {
}
public Person.PersonBuilder personId(Long personId) {
this.personId = personId;
return this;
}
public Person.PersonBuilder personName(String personName) {
this.personName = personName;
return this;
}
public Person.PersonBuilder personPhoneNumber(String personPhoneNumber) {
this.personPhoneNumber = personPhoneNumber;
return this;
}
public Person build() {
return new Person(this.personId, this.personName, this.personPhoneNumber);
}
public String toString() {
return "Person.PersonBuilder(personId=" + this.personId + ", personName=" + this.personName + ", personPhoneNumber=" + this.personPhoneNumber + ")";
}
}
}

view raw

Person.java

hosted with ❤ by GitHub

This is how the class would have looked if I had to write class manually without Lombok. With just 24 lines of code with Lombok, I get getters and setters, builder pattern, a constructor with all the three attributes, a default constructor and a toString() method that appends all the toString() of the class attributes. I could have gotten a lot more, by just adding bunch more Lombok annotations.

Installing Lombok:

Installing lombok is very straight-forward. You need to let the IDE and the build-tool know that you are using Lombok. Rest is all done for you by lombok.

Letting the IDE know:

  1. Download the Lombok jar from here.
  2. Either double-click on the downloaded jar file or run the following command from the location where you downloaded jar.
    java -jar lombok.jar
  3. Lombok will automatically scan your system to find the IDE installations and ask you permission to install Lombok plugin automatically for you. If it was not able to find the installations in their default locations, you also can specify the location where you have installed your IDE too. Screen Shot 2018-04-22 at 6.53.24 PM
  4. Then click on Install button and you are set.

Letting your build tool know:

For maven:

Add the following dependency to your pom file.


<dependencies>
<dependency>
<groupId>org.projectlombok</groupId>
<artifactId>lombok</artifactId>
<version>1.16.20</version>
<scope>provided</scope>
</dependency>
</dependencies>

For gradle:

Add the following to your build.gradle file.


lombok {
version = 1.16.20
sha256 = ""
}

And you are all set to use Lombok in your development environment. May you have all the power that Lombok annotations brings forth. To know what other annotations that Lombok offers take a look at the official documentation here.

Standard